The problem
Our application needs to create PDF reports. The solution tries to accomplish the following ideas:
– No cost (a free solutions)
– Easy to modify style. (e.g, depending on the change it may not be required to redeploy the binary, and since it is HTML most people knows the basics of it).
REMARKS
– You must review the limitations of the WkHtmlToXSharp wrapper at https://github.com/pruiz/WkHtmlToXSharp .
– The wrapper WkHtmlToXSharp does not expose all the native functionality, thus. If you need native functionality, you are likely to have two options: 1) Do it with another library 2) Fork the code at GitHub, expose what you need, and update your library WkHtmlToXSharp with your modifications.
– DotLiquid Markup takes a close approach in regards to security, thus you have to indicate which items are accessible to it templating system, if security is not a major concern, Razor Engine will work equally or better.
The Solution
The solution follows the following high-level overview of the workflow:
– A data source will provide an object which will be the only data source for our report. On this step it is going to be use dynamic feature of C# and System.Dynamic.ExpandObject because they can produce objects wit
– The templating system will use the data source and a template file(s) to produce a HTML.
– The generated HTML will be prided to the PDF Printer in order to create a neat PDF document
If you want to see the code without much explanation, then see it at GitHub in https://github.com/hmadrigal/playground-dotnet/tree/master/MsDotNet.PdfGeneration
Dot Liquid Markup (Templating System)
In here is worth to mention that the templating system is DotLiquid Markup There are more templating systems. A really good one was Razor Engine which is based on the Razor Syntax when creating Web Applications in .NET. Why did I select DotLiquid over Razor Engine, it was a matter of security. Razor Engine will let you access most of the .NET framework, which I think it’s very convenient but less secure since there are file handling, db access and other this can be done with .NET Framework. On the other hand Dot Liquid uses a its custom syntax to specify the template and it is also closed by default, to access specific features, these items (such class classes or types) must be explicitly added, by default most common types and methods are accessible in DotLiquid.
NOTE: Razor Engine does have support for isolating execution by creating an AppDomain, but I simply didn’t want to take that path.
RazorEngine as well as DotLiquidMarkup are well documented although the latter you will find more specific documentation for the Ruby version than the CSharp port.
Most of the Ruby documentation for Liquid Template is applicable to DotLiquid (obviously using C# instead of Ruby).
http://www.rubydoc.info/gems/liquid/
http://liquidmarkup.org/
https://docs.shopify.com/themes/liquid-documentation/basics
At last DotLiquidMarkup is extensible, in our example we use some extensions (aka filters, since extensions can be of different types) for producing Base64 encoding, Html encoding and ToLocalUri.
DotLiquidMarkup is accessible thru Nuget At https://www.nuget.org/packages/DotLiquid/
WkHtmlToXSharp ( wkhtmltopdf ) (HTML To PDF Printer)
WkHtmlToXSharp is a wrapper for the native open-source library wkhtmltopdf. The native library is quite flexible and robust and it is available in Windows and Unix-like systems. The wrapper WkHtmlToXSharp does not expose all the funcionality of the native library, thus if you need some functionality you are likely to have two options:
1- Fork the project at GitHub, add your customization, and use the your library. (You can do the pull-request if you want to share the changes)
2- Once the PDF is generated, you could use other third party library to perform modifications.
To see the wrapper limitations and capabilities go to
https://github.com/pruiz/WkHtmlToXSharp
To see native library capabilities go to
http://wkhtmltopdf.org/
http://wkhtmltopdf.org/libwkhtmltox/pagesettings.html
https://madalgo.au.dk/~jakobt/wkhtmltoxdoc/wkhtmltopdf-0.9.9-doc.html
The library is accessible thru nuget
https://www.nuget.org/packages/WkHtmlToXSharp/ (Main)
https://www.nuget.org/packages/WkHtmlToXSharp.Win32/ (Win32)
https://www.nuget.org/packages/WkHtmlToXSharp.Win64/ (Win64)
Because of a native library is being used, there are platform specific wrappers. The wrapper already includes the native library, and it decompressed it when the application starts up. This increases the size of the app in memory (and disk), but simplyfies deployment and distribution (A fair trade-off).
Dynamic C#
I hope that by using dynamic the template engine will have the enough independence (and simplicity) in the data source. Normally data sources for reports are unknown structures. You only define the structure when somebody asks you to create the report. In scenarios like the previously explained, dynamic fits well, since we can populate our data objects specifying “on-the-fly” properties without much code or complexity.
See Dynamic in C# 4 for more details. For a more advance use of dynamic see http://blogs.msdn.com/b/csharpfaq/archive/2009/10/19/dynamic-in-c-4-0-creating-wrappers-with-dynamicobject.aspx
Show me the code
Rather than me copying and pasting all project’s code, I’ll share what I consider are the most relevant classes and explain their goals.
The first code, it is just a fake data layer, which provides information for the report to consume. The code is in project MsDotNet.PdfGeneration.Data.
using FakeData;
using System;
using System.Collections.Generic;
using System.Dynamic;
using System.Linq;

namespace PdfGeneration.Data
{
    public class DataProvider
    {
        public dynamic GetReportData()
        {
            // Generating employee list
            var employees = Enumerable
                .Range(0, NumberData.GetNumber(10, 50))
                .Select(i =>
                   {
                       dynamic newEmployee = new ExpandoObject();
                       newEmployee.BirthDate = DateTimeData.GetDatetime(new DateTime(1973, 1, 1), new DateTime(1997, 12, 1));
                       newEmployee.FirstName = NameData.GetFirstName();
                       newEmployee.LastName = NameData.GetSurname();
                       newEmployee.Company = NameData.GetCompanyName();
                       newEmployee.Email = NetworkData.GetEmail();
                       newEmployee.PhoneNumber = PhoneNumberData.GetInternationalPhoneNumber();
                       newEmployee.Address = string.Format("{0} {1} {2}\n{3},{4} {5}", PlaceData.GetStreetName(), PlaceData.GetStreetNumber(), PlaceData.GetAddress(), PlaceData.GetCity(), PlaceData.GetState(), PlaceData.GetZipCode());
                       newEmployee.PersonalQuote = TextData.GetSentences(5);
                       // NOTE: Even though ExpandoObject is compatible with IDictionary<string,object>,
                       //       The template engine only accepts Dictionary<string,object>
                       return new Dictionary<string, object>(newEmployee);
                   })
                .ToList();

            dynamic reportData = new ExpandoObject();
            reportData.Employees = employees;
            return reportData;
        }
    }
}
Once we the data, we should pass it to our Template System (DotLiquid). The template system has three components:
1. The template file(s) (assets files and dot liquid files). (These are at the project MsDotNet.PdfGeneration.Templating
2. The Data. It’s generated by the project MsDotNet.PdfGeneration.Data.
3. The codes which joins data and template files to produce the output. The code for this is at MsDotNet.PdfGeneration.Templating
In this case, first lets take a look at each of them:
{% assign dateFormat = 'MM/dd/yyyy' %}
<!DOCTYPE html>
<html lang="en" xmlns="http://www.w3.org/1999/xhtml">
<head>
<meta charset="utf-8" />
<title></title>
<link href="{{ "Assets/bootstrap.css" | ToLocalUri }}" rel="stylesheet" type="text/css" />
<style type="text/css">
@font-face {
font-family: 'FontAwesome';
src: local('FontAwesome'), url(data:font/woff;base64,{{ "Assets/fontawesome-webfont.woff" | ToBase64 }}) format('woff');
}
@media print {
.page-break-after {
page-break-after: always;
}
.page-break-before {
page-break-before: always;
}
}
body {
height: 297mm;
width: 210mm;
margin-left: auto;
margin-right: auto;
}
</style>
<link href="{{ "Assets/fontawesome.css" | ToLocalUri }}" rel="stylesheet" type="text/css" />
</head>
<body>
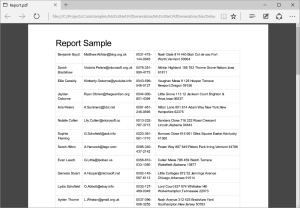
<h1>Report Sample</h1>
<table class="table table-bordered">
{% for employee in Employees %}
<tr>
<td>{{ employee.FirstName | HtmlEncode }} {{ employee.LastName | HtmlEncode }}</td>
<td>{{ employee.Email | HtmlEncode }}</td>
<td>{{ employee.PhoneNumber | HtmlEncode }}</td>
<td>{{ employee.Address | HtmlEncode }}</td>
</tr>
{% endfor %}
</table>
</body>
</html>
Other than the template file, it uses a CSS for styling and woff to provide a custom font. note that HTML syntax is standard, and we can add Dot Liquid syntax into the HTML file to support dynamic content. Please refer to Liquid Market syntax for understanding it.
In the template we are using custom filters,
HtmlEncode: Makes sure that the output is encoded to be displayed in HTML.
ToLocalUri: Converts a given relative path to an absolute path.
ToBase64: Encodes the input (a file or a text) to Base64, This is useful when using Data Uri ( https://en.wikipedia.org/wiki/Data_URI_scheme ). Data Uri are used to embed resources into the HTML, for example images, fonts, etc.
The code which handles the DotLiquidMarkup is at MsDotNet.PdfGeneration.Templating
using System;
using System.Linq;

namespace PdfGeneration.Templating.Extensibility
{
    public static class CustomFilters
    {
        public static string HtmlEncode(object input)
        {
            var htmlInput = input == null ? null : System.Net.WebUtility.HtmlEncode(input.ToString());
            return htmlInput;
        }

        public static string ToBase64(object input, string directory = null)
        {
            directory = directory ?? AppDomain.CurrentDomain.BaseDirectory;
            byte[] buffer = null;
            var inputAsFilePath = (input as string) ?? string.Empty;
            inputAsFilePath = System.IO.Path.Combine(directory, inputAsFilePath);
            if (!string.IsNullOrEmpty(inputAsFilePath) && System.IO.File.Exists(inputAsFilePath))
            {
                buffer = System.IO.File.ReadAllBytes(inputAsFilePath);
            }
            else if (input is System.Collections.Generic.IEnumerable<byte>)
            {
                var inputAsBytes = input as System.Collections.Generic.IEnumerable<byte>;
                buffer = inputAsBytes.ToArray();
            }
            else
            {
                buffer = System.Text.Encoding.Default.GetBytes(input.ToString());
            }

            if (buffer == null)
                return string.Empty;

            var base64String = Convert.ToBase64String(buffer);
            return base64String;
        }

        public static string ToLocalUri(object input, string directory = null)
        {
            directory = directory ?? AppDomain.CurrentDomain.BaseDirectory;
            var inputAsFilePath = (input as string) ?? string.Empty;
            inputAsFilePath = System.IO.Path.Combine(directory, inputAsFilePath);
            var filePathUri = new Uri(inputAsFilePath);
            return filePathUri.ToString();
        }
    }
}
using System;
using System.Collections.Generic;
using System.IO;
using System.Linq;
using System.Text;

namespace PdfGeneration.Templating
{
    public class TemplateRender
    {
        public TemplateRender()
        {
            Initialize();
        }

        private void Initialize()
        {
            DotLiquid.Template.RegisterFilter(typeof(Extensibility.CustomFilters));
            DotLiquid.Liquid.UseRubyDateFormat = false;
            DotLiquid.Template.NamingConvention = new DotLiquid.NamingConventions.CSharpNamingConvention();
        }

        public void AddKnownType(params Type[] visibleTypes)
        {
            visibleTypes = visibleTypes ?? Enumerable.Empty<Type>().ToArray();
            foreach (var type in visibleTypes)
            {
                var typeProperties = type.GetProperties();
                DotLiquid.Template.RegisterSafeType(type, typeProperties.Select(property => property.Name).ToArray());
            }
        }

        public void RenderTemplate(string templateFilePath, string htmlFilePath, dynamic model)
        {
            using (Stream htmlStream = new FileStream(htmlFilePath, FileMode.OpenOrCreate))
                RenderTemplate(templateFilePath, htmlStream, model);
        }

        public void RenderTemplate(string templateFilePath, Stream htmlStream, dynamic model, bool hasToLeaveStreamOpen = false)
        {
            using (TextWriter htmlTextWriter = new StreamWriter(htmlStream, Encoding.Default, 4096, hasToLeaveStreamOpen))
            {
                RenderTemplate(templateFilePath, htmlTextWriter, model);
            }
        }

        public void RenderTemplate(string templateFilePath, TextWriter htmlTextWriter, dynamic model)
        {
            var template = DotLiquid.Template.Parse(File.ReadAllText(templateFilePath));
            var templateRenderParameters = new DotLiquid.RenderParameters();
            var directorySeparator = Path.DirectorySeparatorChar.ToString();
            var templateDirectory = Path.GetFullPath(
                (templateFilePath.StartsWith(directorySeparator, StringComparison.InvariantCultureIgnoreCase) || templateFilePath.StartsWith("." + directorySeparator, StringComparison.InvariantCultureIgnoreCase))
                ? Path.GetDirectoryName(Path.Combine(AppDomain.CurrentDomain.BaseDirectory, templateFilePath))
                : Path.GetDirectoryName(templateFilePath)
            );

            DotLiquid.Template.FileSystem = new DotLiquid.FileSystems.LocalFileSystem(templateDirectory);
            templateRenderParameters.LocalVariables =
                model is System.Dynamic.ExpandoObject
                ? DotLiquid.Hash.FromDictionary(model as IDictionary<string, object>)
                : DotLiquid.Hash.FromAnonymousObject(model)
            ;
            template.Render(htmlTextWriter, templateRenderParameters);
            htmlTextWriter.Flush();
        }
    }
}
Now, we have the data , and some logic which creates an HTML based on a given data. The next component is at the project MsDotNet.PdfGeneration.PdfPrinting. In here an HTML is received and converted by the low level library as PDF.
using System;
using WkHtmlToXSharp;

namespace PdfGeneration.PdfPrinting
{
    // See more information about the WkHtmlTox
    // http://wkhtmltopdf.org/libwkhtmltox/pagesettings.html
    // https://madalgo.au.dk/~jakobt/wkhtmltoxdoc/wkhtmltopdf-0.9.9-doc.html

    public class HtmlToPdfPrinter
    {
        static HtmlToPdfPrinter()
        {

            WkHtmlToXLibrariesManager.Register(new Win32NativeBundle());
            WkHtmlToXLibrariesManager.Register(new Win64NativeBundle());
        }

        public void Print(string htmlFilePath, string pdfFilePath)
        {
            using (System.IO.Stream pdfStreamWriter = System.IO.File.OpenWrite(pdfFilePath))
            using (var multiplexingConverter = GetDefaultConverter(
                setUpAction: m => m.ObjectSettings.Page = new Uri(htmlFilePath).ToString()
            ))
            {
                var pdfBytes = multiplexingConverter.Convert();
                pdfStreamWriter.Write(pdfBytes, 0, pdfBytes.Length);
                pdfStreamWriter.Flush();
            }
        }

        public void Print(System.IO.Stream htmlStream, System.IO.Stream pdfStream)
        {
            using (System.IO.TextReader htmlReader = new System.IO.StreamReader(htmlStream))
            {
                Print(htmlReader, pdfStream);
            }
        }

        public void Print(System.IO.TextReader htmlReader, System.IO.Stream pdfStream)
        {
            var htmlContent = htmlReader.ReadToEnd();
            Print(htmlContent, pdfStream);
        }

        public void Print(string htmlContent, System.IO.Stream pdfStream)
        {
            using (var multiplexingConverter = GetDefaultConverter())
            {
                var pdfBytes = multiplexingConverter.Convert(htmlContent);
                pdfStream.Write(pdfBytes, 0, pdfBytes.Length);
                pdfStream.Flush();
            }
        }

        private IHtmlToPdfConverter GetDefaultConverter(Action<IHtmlToPdfConverter> setUpAction = null)
        {
            var multiplexingConverter = new MultiplexingConverter();
            multiplexingConverter.ObjectSettings.Web.PrintMediaType = true;
            multiplexingConverter.GlobalSettings.Margin.Top = "1.25cm";
            multiplexingConverter.GlobalSettings.Margin.Bottom = "1.25cm";
            multiplexingConverter.GlobalSettings.Margin.Left = "1.25cm";
            multiplexingConverter.GlobalSettings.Margin.Right = "1.25cm";

            multiplexingConverter.ObjectSettings.Load.BlockLocalFileAccess = false;
            multiplexingConverter.ObjectSettings.Web.LoadImages = true;
            multiplexingConverter.ObjectSettings.Web.PrintMediaType = true;

            if (setUpAction != null)
                setUpAction(multiplexingConverter);
            return multiplexingConverter;
        }
    }
}
NOTE Please notice that WkHtmlToXSharp requires you to register the native dll, to make sure this happens once the previous code does it at the static constructor.
Now we have everything we need to generate PDF report. A goal partial on this example, was to hide the libraries, in a way that you could replace components (e.g. you want to use razor engine instead of DotLiquidMarkup). For doing this, each project exposes only primitive and built-in types in .NET. Thus, to communicate different modules and dealing with text files, it has been use the most common types: String, TextWriter,TextReader and Stream.
See all the components working together at the main app:
using PdfGeneration.Data;
using PdfGeneration.PdfPrinting;
using PdfGeneration.Templating;
using System;

namespace PdfGeneration
{
    class Program
    {
        static void Main(string[] args)
        {
            var dataProvider = new DataProvider();
            var templateRender = new TemplateRender();
            var htmlToPdfPrinter = new HtmlToPdfPrinter();
            templateRender.AddKnownType();
            var workingDirectory = AppDomain.CurrentDomain.BaseDirectory;
            var pdfFilePath = System.IO.Path.Combine(workingDirectory, @"Report.pdf");
            var templateFilePath = System.IO.Path.Combine(workingDirectory, @"Assets/Report.html");
            var templateDirectoryPath = System.IO.Path.GetDirectoryName(templateFilePath);

            if (System.IO.File.Exists(pdfFilePath))
                System.IO.File.Delete(pdfFilePath);

            dynamic reportData = dataProvider.GetReportData();

            #region Printing Using Stream
            using (System.IO.Stream htmlStream = new System.IO.MemoryStream())
            {
                templateRender.RenderTemplate(templateFilePath, htmlStream, reportData, hasToLeaveStreamOpen: true);
                htmlStream.Seek(0, System.IO.SeekOrigin.Begin);
                using (var pdfStreamWriter = System.IO.File.OpenWrite(pdfFilePath))
                {
                    htmlToPdfPrinter.Print(htmlStream, pdfStreamWriter);
                }
            }
            #endregion

            //#region Printing Using StringBuilder
            //var htmlStringBuilder = new StringBuilder();
            //using (System.IO.TextWriter htmlTextWriter = new System.IO.StringWriter(htmlStringBuilder))
            //{
            //    templateRender.RenderTemplate(templateFilePath, htmlTextWriter, reportData);
            //}
            //using (var pdfStreamWriter = System.IO.File.OpenWrite(pdfFilePath))
            //{
            //    var htmlContent = htmlStringBuilder.ToString();
            //    htmlToPdfPrinter.Print(htmlContent, pdfStreamWriter);
            //}
            //#endregion

            System.Diagnostics.Process.Start(pdfFilePath);
        }
    }
}
I have to admit that this problem is very interesting to resolve and there are many alternatives, my approach strives to be simple and cheap. There are remarks which should be taken into account. Here is a simple result (without any effort on the CSS part)
The code is at
https://github.com/hmadrigal/playground-dotnet/tree/master/MsDotNet.PdfGeneration
Happy coding!