mono

Custom Configuration files in .NET


Hi,

I would like to share some ideas about how to deal with configuration files on .NET. I am sure that there should be many options for implementing configuration files. Some are more likely to better than others and others may depend on the platform (e.g. mobile, desktop, cloud, etc..)  In particular I’ll explain an approach that should be working for your Web Application and for your Desktop application.

The problem:

We want to quickly create a configuration file, since we foresee that our application will have a good amount of settings.

Solution:

I’ll take advantage of the default .NET mechanism for configuration files. It’s plenty flexible and quite extensible. The major drawback is that you’ll have to write code, and sometimes a not-so-easy code. Alternatively you can relay on the existent section handlers, and try to use them when possible.

A brief talk about configuration files

.NET configuration files supports hierarchies and they are extensible. Almost all the cases with defaults is fairly enough, for creating custom sections there I will be explaining three approaches, but certainly there are more. The decision of which approach to take it will depend of how much time you have and also if the team has the will and chance for installing at least the Configuration Section Designer. 

1) Create Custom Section Handler with Code Snippets

This is the simplest one, it’s basically get code snippets of how to create sections for the SectionHandler class. Then you are more likely to have many property of similar times (probably primitive types) but it can safe time for producing the class and understand it. I won’t be providing samples for this.

2) Using the Custom Section Designer from CodePlex at https://csd.codeplex.com/

This is my favorite, but unfortunately it demands that you will have to install a Visual Studio Extension for opening configuration section projects. The best of this approach is that you can get:

  • XSD validation + intelisense
  • XSD Documentation
  • Ease to modify content.
  • etc…

First get proper installer for the extension https://csd.codeplex.com/. Then create a configuration section project (these projects outputs a dll), by conversion these projects end with “.Configuration” for example “MyApp.Configuration” will be dll project that loads the configuration section. In our sample it is provided a project called: ConfigurationFileSample.Configuration

Image

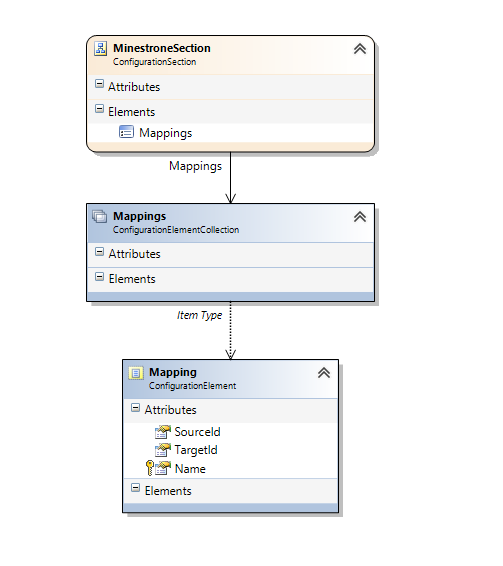
The previous screenshot exemplifies a Section in which it has been defined a Element called Mappings, which is a collection of Mapping elements. By following the instructions at https://csd.codeplex.com/wikipage?title=Defining%20new%20types&referringTitle=Usage you will easily create this configuration. The magic arrive when you are typing these values into visual studio (or any XML editor that supports XSD validation property).

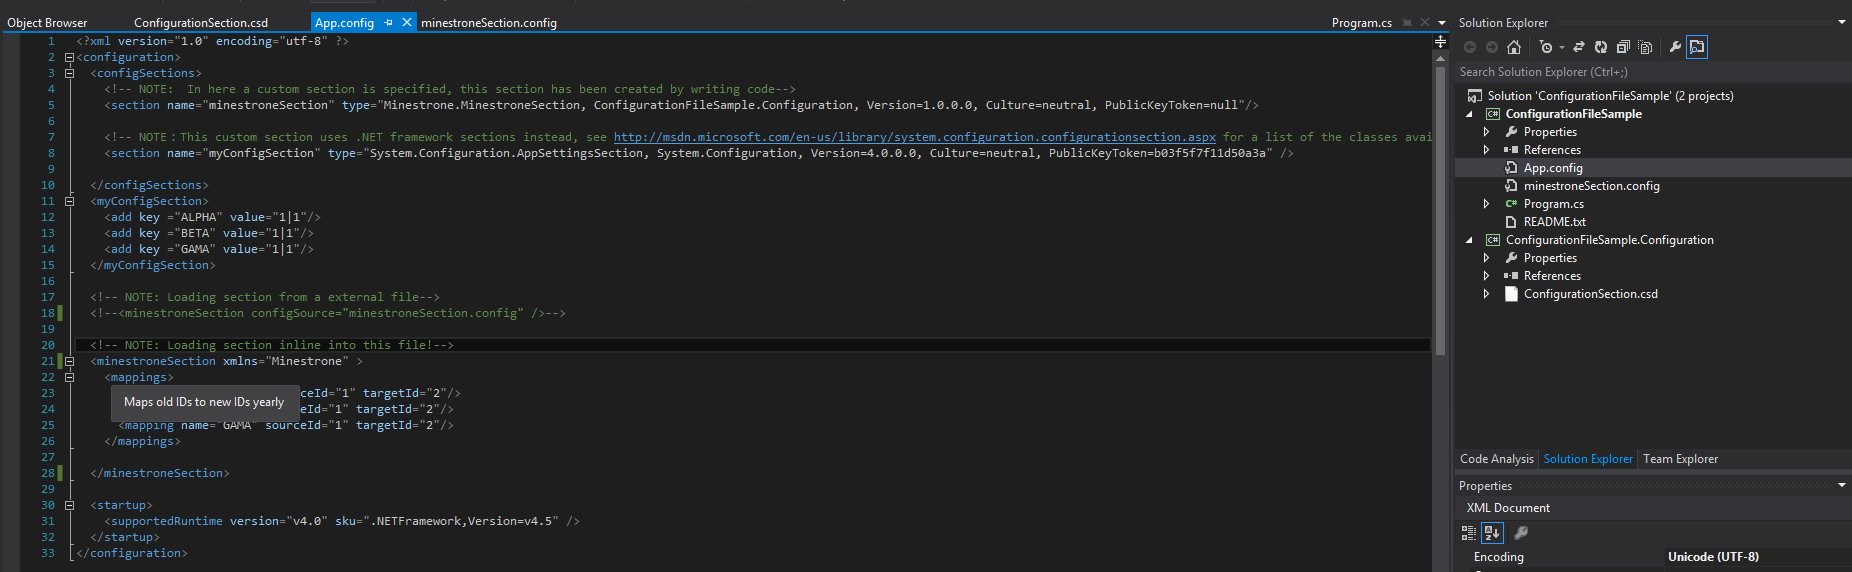
Once you are done designing your configuration file. You save and compile. If it success then add a configuration file to your main project, and also add a reference to the configuration file project. for referencing our custom section we do it into the configSections element. For example:


<!-- NOTE: In here a custom section is specified, this section has been created by writing code--></pre>
<section></section>
<pre>

Visual studio will enable help toltips and XSD validation for you. As you can see in the following screenshot

ConfigurationTooltip

For loading configuration files in code, after adding the reference to the dll, the app can use an static helper of simply use the GetSection method.

For example for loading the section using the default instance:

// NOTE: It is also possible to load the default custom section
Console.WriteLine("\nLoading default Minestrone thru singleton!");
var minestroneSection = Minestrone.MinestroneSection.Instance;
PrintMinestrone(minestroneSection);

Or also you could load a specific section:

// NOTE: You could ask for a given custom section
Console.WriteLine("\nLoading Minestrone by manually specifying a section: minestroneSection");
var minestroneSection = ConfigurationManager.GetSection("minestroneSection") as Minestrone.MinestroneSection;
PrintMinestrone(minestroneSection);

3) Using one of the build in Section Handlers
As I mentioned you also could you the built-in Sectionhandlers from .NET framework There is a list of them at the end of this page: http://msdn.microsoft.com/en-us/library/system.configuration.configurationsection.aspx (basically all the subclasses of System.Configuration.ConfigurationSection )

For example for referencing it into the configuration file:


    <!-- NOTE:This custom section uses .NET framework sections instead, see http://msdn.microsoft.com/en-us/library/system.configuration.configurationsection.aspx for a list of the classes available into the framework --></pre>
<section></section>
<pre>

and for loading it from code:

// NOTE: Loads a custom section, but it uses a .NET built-in class
            Console.WriteLine("\nLoading a ApplicationSettings using a built-in .NET type. (more at http://msdn.microsoft.com/en-us/library/system.configuration.configurationsection.aspx ) ");
            var myConfigSection = ConfigurationManager.GetSection("myConfigSection") as System.Collections.Specialized.NameValueCollection;
            for (int appSettingIndex = 0; appSettingIndex < myConfigSection.Count; appSettingIndex++)
            {
                Console.WriteLine(string.Format("Key:{0} Value:{1}", myConfigSection.AllKeys[appSettingIndex], myConfigSection[appSettingIndex]));
            }
            Console.WriteLine("\n\n PRESS ANY KEY TO FINISH! ");
            Console.ReadKey();

We are almost there, but WAIT!!!!

I know that at this time I haven’t shown how to specify section. Well basically because you can provide the details of the section inline into the same file or specifcying an external file using the configSource attribute (which is available for any custom section).

For example see how the minestroneSection is defined in an external file, and how myConfigSection  is written inline into the configuration file. There are advantages of each approach (e.g. when you want to apply XSLT transformations you may want to apply transformations to a simple file rather than a long and complex XML) o perhaps you may have a config file per environment (e.g. minestrone.debug.config…,)

<?xml version="1.0" encoding="utf-8" ?>
<configuration>
  <configSections>
    <!-- NOTE: In here a custom section is specified, this section has been created by writing code-->
    <section name="minestroneSection" type="Minestrone.MinestroneSection, ConfigurationFileSample.Configuration, Version=1.0.0.0, Culture=neutral, PublicKeyToken=null"/>

    <!-- NOTE:This custom section uses .NET framework sections instead, see http://msdn.microsoft.com/en-us/library/system.configuration.configurationsection.aspx for a list of the classes available into the framework -->
    <section name="myConfigSection" type="System.Configuration.AppSettingsSection, System.Configuration, Version=4.0.0.0, Culture=neutral, PublicKeyToken=b03f5f7f11d50a3a" />

  </configSections>
  <myConfigSection>
    <add key ="ALPHA" value="1|1"/>
    <add key ="BETA" value="1|1"/>
    <add key ="GAMA" value="1|1"/>
  </myConfigSection>

  <!-- NOTE: Loading section from a external file-->
  <minestroneSection configSource="minestroneSection.config" />

  <startup>
    <supportedRuntime version="v4.0" sku=".NETFramework,Version=v4.5" />
  </startup>
</configuration>

I hope this is good enough for setting up quickly custom configuration files in your .NET projects.
The sample is at https://github.com/hmadrigal/playground-dotnet/tree/master/MsDotNet.CustomConfigFile and please remember to install the Custom Section Designer if you want to take the option for more detailed configuration file.

Regards,
Herber

Aspect Oriented Programming and Interceptor design pattern with Unity 2


Hello,

I’ve found a Microsoft article about Unity and Aspect Oriented programming. The article was really interesting. Then, to be the theory in action I’ve decide to exemplify how Unity 2 uses the Interceptor design pattern to support Aspect Oriented Programming (aka AOP).  First of all, let talk about the three key elements involved into this example:

Once again, I’ve decide to use MonoDevelop to create the sample and the source code is available to be downloaded from github at
https://github.com/hmadrigal/playground-dotnet/tree/master/MsUnity.AspectOriented

Sample structure

This example supposes that you have a proxy and want it to add logging information. Thus, we’ve defined a contract (interface) called IProxy to define the expected behavior of our proxy. Then, we have in a separate project an concrete implementation Proxy which implements the interface IProxy. At last but not a least, we have a project which defines a Unity interceptor. All these components are united by the configuration file which lets unity know how these components should interact.

AspectOriented.Infrastructure’s project

This project contains all the common resources and the contracts (interfaces) to be used in the sample. Here is defined the IProxy interface:

using System;
namespace AspectOriented.Infrastructure.Services
{
  public interface IProxy
  {
    bool IsEnabled ();
    void Open ();
    void Close ();
  }
}

AspectOriented.UnityInterceptors’s project

The second project we’re going to talk is where the interceptor is defined. As we’ve already mentioned the interceptor will allow unity to perform tasks before and/or after the intercepted method is invoked. To define  which method is going to be intercepted, we can use two alternatives: 1)a configuration file or 2) by writing some code. I’ll talk about the Unity configuration file once I explain the AspectOriented.Terminal’s project.

using System;
using System.Collections.Generic;
using Microsoft.Practices.Unity.InterceptionExtension;

namespace AspectOriented.UnityInterceptors
{
	public class DiagnosticInterceptor : IInterceptionBehavior
	{
		public DiagnosticInterceptor ()
		{
		}

		#region IInterceptionBehavior implementation
		public IMethodReturn Invoke (IMethodInvocation input, GetNextInterceptionBehaviorDelegate getNext)
		{
			System.Console.WriteLine (String.Format ("[{0}:{1}]", this.GetType ().Name, "Invoke"));

			// BEFORE the target method execution
			System.Console.WriteLine (String.Format ("{0}", input.MethodBase.ToString ()));

			// Yield to the next module in the pipeline
			var methodReturn = getNext ().Invoke (input, getNext);

			// AFTER the target method execution
			if (methodReturn.Exception == null) {
				System.Console.WriteLine (String.Format ("Successfully finished {0}", input.MethodBase.ToString ()));
			} else {
				System.Console.WriteLine (String.Format ("Finished {0} with exception {1}: {2}", input.MethodBase.ToString (), methodReturn.Exception.GetType ().Name, methodReturn.Exception.Message));
			}

			return methodReturn;
		}

		public IEnumerable<Type> GetRequiredInterfaces ()
		{
			System.Console.WriteLine (String.Format ("[{0}:{1}]", this.GetType ().Name, "GetRequiredInterfaces"));
			return Type.EmptyTypes;
		}

		public bool WillExecute {
			get {
				System.Console.WriteLine (String.Format ("[{0}:{1}]", this.GetType ().Name, "WillExecute"));
				return true;
			}
		}
		#endregion
	}
}

As you might noticed the interceptor implements IInterceptionBehavior which will let Unity know that this class can act like an interceptor. To simplify things, the interceptor will print message only when the intercepted method is invoked. The printed information is about the method being invoked. However, interceptors can perform more complex such as starting threads, performing web requests and so on.

AspectOriented.Terminal’s project

This is the main project which generates the executable file. Here are two important things to point out. First we’ve configured our container here. In this case  Unity has being configured by using the configuration file, however you can use code instead. The second, the main application performs calls on the instance that unity resolves, the interception process happens behind scenes and we only will see the result when we call the methods of the proxy.

<?xml version="1.0" encoding="utf-8"?>
<configuration>
	<configSections>
		<section name="unity" type="Microsoft.Practices.Unity.Configuration.UnityConfigurationSection, Microsoft.Practices.Unity.Configuration" />
	</configSections>
	<unity xmlns="http://schemas.microsoft.com/practices/2010/unity">
		<!-- Interception is not part of the default Unity configuration schema. -->
		<!-- Before you can configure interception you must add the correct sectionExtension element to your configuration -->
		<!-- section in the configuration file.-->
		<sectionExtension type="Microsoft.Practices.Unity.InterceptionExtension.Configuration.InterceptionConfigurationExtension, Microsoft.Practices.Unity.Interception.Configuration" />
		<!-- Defines some aliast to easily manipulate the mappings -->
		<alias alias="IProxy" type="AspectOriented.Infrastructure.Services.IProxy, AspectOriented.Infrastructure" />
		<alias alias="Proxy" type="AspectOriented.Terminal.Services.Proxy, AspectOriented.Terminal" />
		<alias alias="DiagnosticInterceptor" type="AspectOriented.UnityInterceptors.DiagnosticInterceptor, AspectOriented.UnityInterceptors" />
		<!-- Default Container when creating the tree-chain of resolution-->
		<container>
			<!-- Loading the section extension only enables the interception configuration to be given in the configuration file. -->
			<!-- Interception itself will not work unless you also load the interception container extension in your Unity container instance.-->
			<extension type="Interception" />
			<register type="IProxy" mapTo="Proxy">
				<lifetime type="ContainerControlledLifetimeManager" />
				<interceptor type="InterfaceInterceptor" />
				<interceptionBehavior type="DiagnosticInterceptor" />
			</register>
		</container>
	</unity>
</configuration>

The configuration file defines two section which are mandatory to define interceptors, these are sectionExtension and extension. Then into the registration of a given type (or in our sample the IProxy Type) we can define the interceptors for this particular type resolution.

using System;
using Microsoft.Practices.Unity;
using Microsoft.Practices.Unity.Configuration;
using System.Configuration;
using AspectOriented.Infrastructure.Services;

namespace AspectOriented.Terminal
{
	class MainClass
	{
		public static void Main (string[] args)
		{
			// Loads the container
			IUnityContainer container = new UnityContainer ();
			container = Microsoft.Practices.Unity.Configuration.UnityContainerExtensions.LoadConfiguration (container);

			// Resolve the proxy-sample
			var proxy = Microsoft.Practices.Unity.UnityContainerExtensions.Resolve<IProxy> (container);
			if (proxy.IsEnabled ()) {
				proxy.Open ();
			}
			proxy.Close ();

			// End of the test
			Console.ReadKey ();
		}
	}
}

At last but not least we’ve our main code. It’s quite straightforward, it creates a Unity container, loads the container configuration from the configuration file, and then uses the container to resolve the given interface (contract). As I mentioned the magic happens behind-scenes, when you call the Proxy methods there is functionality which is going to be injected before and after each call of this instance. Take a look of the final screen-shot to see the all the terminal messages which were triggered during the method calls of the Proxy.

As you can notice the interception calls are injected before and after each call of the intercepted methods of our proxy instance. Furthermore, we can inject the same logic to different contracts (interfaces) by only updating the configuration file. If there is not a contract, it is still possible to perform interception, Unity 2 supports three mechanisms for interception, just keep in mind that each mechanism has its pros and cons.  Remember that same functionality can be plugged to any other component (instance) by using the same mechanism.

Resources about this topic

Once again, I’ve decide to use MonoDevelop to create the sample and the source code is available to be downloaded from github at
https://github.com/hmadrigal/playground-dotnet/tree/master/MsUnity.AspectOriented

Unity 2 Setting up the Chain of Responsability pattern and using a configuration file with Mono (monodevelop)


Unity 2 Setting up the Chain of Responsability pattern and using a configuration file with Mono (monodevelop)

The Chain of Responsibility pattern helps to accomplish two main goals when developing software. It keeps very specific
functionality into separate modules, and by using unity we can decide easily plug and unplug functionality.

If you haven’t heard about Chain of Responsibility pattern see http://en.wikipedia.org/wiki/Chain-of-responsibility_pattern, on the other hand, if you haven’t heard about Microsoft Unity 2 Block (an IoC or dependency injection framework, please check http://unity.codeplex.com/.

Now, lets get started with a simple sample.

1. Get Microsoft Unity 2 Block
I’m going to use mono just to show that it’s possible to use Unity on Mono ;-). So, first of all download Unity Source code from codeplex site at http://unity.codeplex.com/SourceControl/list/changesets# . Once you download the source code, you can remove tests and the compile the project. it should compile properly. (BTW I’m using Mono 2.4)

2. In our sample, the application uses repositories, to get and store user data. Our sample has create a project per layer, and these projects communicate by implementing the interfaces (contracts) from the Infrastructure project. Lets see some notes about each layer.

  • “Data” project will retrieve real data from the data base.
  • “Dummy” project will produce dummy data.
  • “Cache” project will perform cache tasks, and then delegate the data retrival tasks to a given sucessor.
  • “Logging” project will perform logging tasks, and then delegate the data retrival to a give successor.
  • “Infrastructure” project will define the interface that is required for the UserRepository. So all projects knows what is the expected input and output for the UserRepository. Additionally it has been define a ISuccessor interface in order to identify layers that require a successor (for example Logging, Cache).

For the sake of the sample, the IUserRepository defines only one operation GetUserFullName. In this opertion, each implementation will add a text indicating that it has been performed a call to each given layer. By using unity 2 we will be able to indicate which levels will be loaded and executed through a configuration file.

using System;
namespace ChainOfResponsability.Infrastructure.Repository
{
	public interface IUserRepository
	{
		string GetUserFullName(int id);
	}
}

This code is sample of the contract that each different layer is going to implement if they want to be part of the chain for IUserRepository.
Additionally, ISuccessor is defined as following:

using System;
namespace ChainOfResponsability.Infrastructure
{
	public interface ISuccessor<T>
	{
		T Successor {get;}
	}
}

This generic interface allows to indicate a successor to perform the next call in the chain.

3. The “Logging” and “Cache” projects will implement IUserRepository and ISuccessor interfaces, and additionally they will require the successor as parameter of the constructor in order to delegate the task itself. Because of Unity 2 can only resolve one (anonymous) mapping for a given type (always into the same container). My colleague Marvin (aka Murven ) suggested a workaround. Basically, each layer which implements ISuccessor will receive in its constructor the IUnityContainer which will resolve the contract, but instead of using the given container, it will use the parent to resolve the type. So, it could get a different resolution for the same given type.

using System;
using ChainOfResponsability.Infrastructure.Repository;
using ChainOfResponsability.Infrastructure;
using ContainerExtensions = Microsoft.Practices.Unity.UnityContainerExtensions;
using Microsoft.Practices.Unity;
namespace ChainOfResponsability.Logging.Repository
{
	public class LoggingUserRespository : IUserRepository, ISuccessor<IUserRepository>
	{
		public LoggingUserRespository (IUnityContainer container)
		{
			this.Successor = ContainerExtensions.Resolve<IUserRepository> (container.Parent);
		}

		#region IUserRepository implementation
		public string GetUserFullName (int id)
		{
			return string.Format ("{0}->{1}", this.GetType ().Name, this.Successor.GetUserFullName (id));
		}
		#endregion

		#region ISuccessor[IUserRepository] implementation
		public IUserRepository Successor { get; set; }
		#endregion

	}
}
using System;
using ChainOfResponsability.Infrastructure;
using ChainOfResponsability.Infrastructure.Repository;
using Microsoft.Practices.Unity;
using ContainerExtensions = Microsoft.Practices.Unity.UnityContainerExtensions;
namespace ChainOfResponsability.Cache.Repository
{
	public class CacheUserRepository : IUserRepository, ISuccessor<IUserRepository>
	{
		public CacheUserRepository (IUnityContainer container)
		{
			this.Successor = ContainerExtensions.Resolve<IUserRepository> (container.Parent);
		}

		#region IUserRepository implementation
		public string GetUserFullName (int id)
		{
			return string.Format ("{0}->{1}", this.GetType ().Name, this.Successor.GetUserFullName (id));
		}
		#endregion

		#region ISuccessor[IUserRepository] implementation
		public IUserRepository Successor { get; set; }
		#endregion
	}
}

Even though both files owns a similar structure, each file can add a very specific functionality (caching or logging) in the previous example, and the invoke the proper successor.

4. The “Data” and “Dummy” projects will implement IUserRepository only and they will implement the task itself.

using System;
using ChainOfResponsability.Infrastructure;
using ChainOfResponsability.Infrastructure.Repository;
namespace ChainOfResponsability.Dummy.Repository
{
	public class DummyUserRepository : IUserRepository
	{
		public DummyUserRepository ()
		{
		}

		#region IUserRepository implementation
		public string GetUserFullName (int id)
		{
			return string.Format ("{0}[{1}]", this.GetType ().Name, id);
		}
		#endregion
	}
}
using System;
using ChainOfResponsability.Infrastructure;
using ChainOfResponsability.Infrastructure.Repository;
namespace ChainOfResponsability.Data.Repository
{
	public class DataUserRepository : IUserRepository
	{
		public DataUserRepository ()
		{
		}

		#region IUserRepository implementation
		public string GetUserFullName (int id)
		{
			return string.Format ("{0}[{1}]", this.GetType ().Name, id);
		}
		#endregion
	}
}

In the case of “Data” and “Dummy” layers, they don’t need a successor so they can perform the task itself and return the proper result.

6. There is an additional step, which is to load all the containers from the configuration file. Basically it’s done by looping through all the containers and asking for a new child on each iteration. So, we can create a sort of chain of containers where each one owns a different type resolution for the save given type. I’ve created an small utility which load the different containers and create a chain (container and parents).

        public static IUnityContainer container;
	private static void UnityBootStrap()
        {
            container = new UnityContainer();
            UnityConfigurationSection section = (UnityConfigurationSection)ConfigurationManager.GetSection("unity");

            #region Mappings based on the configuration file
            IUnityContainer currentContainer = container;
            foreach (var containerSection in section.Containers)
            {
                var nestedContainer = currentContainer.CreateChildContainer();
                Microsoft.Practices.Unity.Configuration.UnityContainerExtensions.LoadConfiguration(nestedContainer, section, containerSection.Name);
                currentContainer = nestedContainer;
            }
            container = currentContainer;
            #endregion
        }

This code loads the configuration file of Unity, and creates a containers which has a parent, and its parent has a different parent and so on. In this way we can create a chain with different mappings to the same IUserRepository contract. Additionally the following configuration file has been defined:

<?xml version="1.0" encoding="utf-8" ?>
<configuration>
  <configSections>
    <section name="unity" type="Microsoft.Practices.Unity.Configuration.UnityConfigurationSection, Microsoft.Practices.Unity.Configuration"/>
  </configSections>
  <unity xmlns="http://schemas.microsoft.com/practices/2010/unity">
  	<!-- Defines some aliast to easily manipulate the mappings -->
    <alias alias="IUserRepository" type="ChainOfResponsability.Infrastructure.Repository.IUserRepository, ChainOfResponsability.Infrastructure" />
    <alias alias="DataUserRepository" type="ChainOfResponsability.Data.Repository.DataUserRepository, ChainOfResponsability.Data" />
    <alias alias="DummyUserRepository" type="ChainOfResponsability.Dummy.Repository.DummyUserRepository, ChainOfResponsability.Dummy" />
    <alias alias="CacheUserRepository" type="ChainOfResponsability.Cache.Repository.CacheUserRepository, ChainOfResponsability.Cache" />
    <alias alias="LoggingUserRespository" type="ChainOfResponsability.Logging.Repository.LoggingUserRespository, ChainOfResponsability.Logging" />

    <!-- Default Container when creating the tree-chain of resolution-->
    <container>
    </container>
    <!-- lowest level of the resolution chain -->
    <container name="DummyContainer">
      <register type="IUserRepository" mapTo="DummyUserRepository">
        <lifetime type="ContainerControlledLifetimeManager" />
      </register>
    </container>
    <container name="DataContainer">
      <register type="IUserRepository" mapTo="DataUserRepository">
        <lifetime type="ContainerControlledLifetimeManager" />
      </register>
    </container>
    <!-- Middle tiers. They can be added as many as needed, while they implement the proper interface -->
    <!-- Concrete implementations are chained because they're properly implementing ISuccessor interface -->
    <container name="CacheContainer">
      <register type="IUserRepository" mapTo="CacheUserRepository">
        <lifetime type="ContainerControlledLifetimeManager" />
      </register>
    </container>
    <!-- Chain of excution starts here! -->
    <container name="LoggingContainer">
      <register type="IUserRepository" mapTo="LoggingUserRespository">
        <lifetime type="ContainerControlledLifetimeManager" />
      </register>
    </container>
  </unity>
</configuration>

7. Because of we only have a common reference between projects (technically all projects are referencing “Infrastructure”, and some projects are referencing Unity. The final project does not need to reference all the implementations, but we have to copy the DLLs of each layer before running the application. If not, we will receive a message like:
The type name or alias …. could not be resolved. Please check your configuration file and verify this type name.” Assuming that you’ve written correctly all the types and DLLs names, then this error appears because the application couldn’t find the DLLs required to load the specified type. So, remember to copy the DLLs when running the application.

		public static void Main (string[] args)
		{
			UnityBootStrap();
			//var userRepository = Microsoft.Practices.Unity.UnityContainerExtensions.Resolve<IUserRepository>(container);
			var userRepository =  ContainerExtensions.Resolve<IUserRepository>(container);
			Console.WriteLine ("Call Stack of Layers when invoking GetUserFullName(0):\n {0} ", userRepository.GetUserFullName(0));
		}

At last but not least you can modify the configuration file to dynamically chance the layers that will be executed without changing your code. For example our first call will produce”

Calling our Sample with the Data Layer

And we can replace the “Data” layer with the “Dummy” layer just by commenting the “Data” layer definition into the configuration file.

Calling with Dummy Layer

Certainly this could open the door to more complex tasks and scenarios. The full source code of this sample has been hosted in GitHub at
https://github.com/hmadrigal/playground-dotnet/tree/master/MsUnity.ChainOfResponsability

Best regards,
Herber

IPhone and C# Development


Hi

For those enthusiastic developers that want to developer IPhone applications, but they’re currently Microsoft (C# or .NET) developers there is an very particular option.

The mono project has added a new tool, the monotouch (see http://monotouch.net/) which basically will let you to write C# code in order to developer native IPhone apps.

Although MonoDevelop is free (http://monodevelop.com/) , this related project has different prices based on the version of the product.  Requirements for IPhone development itself hasn’t changed, which means other than the MonoTouch software, it’s nedded to have mac hardware, an IPhone SDK, and you will have to be part of IPhone Developer Program.

Lets see if the future will brings us more options other than C#, and Objective-C 😉

Regards,

Herberth