.net

Creating PDF Reports from HTML using Dotliquid (Markup) for templates and WkHtmlToXSharp for printing PDF


The problem

Our application needs to create PDF reports. The solution tries to accomplish the following ideas:
– No cost (a free solutions)
– Easy to modify style. (e.g, depending on the change it may not be required to redeploy the binary, and since it is HTML most people knows the basics of it).

REMARKS

– You must review the limitations of the WkHtmlToXSharp wrapper at https://github.com/pruiz/WkHtmlToXSharp .
– The wrapper WkHtmlToXSharp does not expose all the native functionality, thus. If you need native functionality, you are likely to have two options: 1) Do it with another library 2) Fork the code at GitHub, expose what you need, and update your library WkHtmlToXSharp with your modifications.
– DotLiquid Markup takes a close approach in regards to security, thus you have to indicate which items are accessible to it templating system, if security is not a major concern, Razor Engine will work equally or better.

The Solution

The solution follows the following high-level overview of the workflow:

– A data source will provide an object which will be the only data source for our report. On this step it is going to be use dynamic feature of C# and System.Dynamic.ExpandObject because they can produce objects wit
– The templating system will use the data source and a template file(s) to produce a HTML.
– The generated HTML will be prided to the PDF Printer in order to create a neat PDF document

If you want to see the code without much explanation, then see it at GitHub in https://github.com/hmadrigal/playground-dotnet/tree/master/MsDotNet.PdfGeneration

Dot Liquid Markup (Templating System)

In here is worth to mention that the templating system is DotLiquid Markup There are more templating systems. A really good one was Razor Engine which is based on the Razor Syntax when creating Web Applications in .NET. Why did I select DotLiquid over Razor Engine, it was a matter of security. Razor Engine will let you access most of the .NET framework, which I think it’s very convenient but less secure since there are file handling, db access and other this can be done with .NET Framework. On the other hand Dot Liquid uses a its custom syntax to specify the template and it is also closed by default, to access specific features, these items (such class classes or types) must be explicitly added, by default most common types and methods are accessible in DotLiquid.
NOTE: Razor Engine does have support for isolating execution by creating an AppDomain, but I simply didn’t want to take that path.

RazorEngine as well as DotLiquidMarkup are well documented although the latter you will find more specific documentation for the Ruby version than the CSharp port.

Most of the Ruby documentation for Liquid Template is applicable to DotLiquid (obviously using C# instead of Ruby).
http://www.rubydoc.info/gems/liquid/
http://liquidmarkup.org/
https://docs.shopify.com/themes/liquid-documentation/basics

At last DotLiquidMarkup is extensible, in our example we use some extensions (aka filters, since extensions can be of different types) for producing Base64 encoding, Html encoding and ToLocalUri.

DotLiquidMarkup is accessible thru Nuget At https://www.nuget.org/packages/DotLiquid/

WkHtmlToXSharp ( wkhtmltopdf ) (HTML To PDF Printer)

WkHtmlToXSharp is a wrapper for the native open-source library wkhtmltopdf. The native library is quite flexible and robust and it is available in Windows and Unix-like systems. The wrapper WkHtmlToXSharp does not expose all the funcionality of the native library, thus if you need some functionality you are likely to have two options:
1- Fork the project at GitHub, add your customization, and use the your library. (You can do the pull-request if you want to share the changes)
2- Once the PDF is generated, you could use other third party library to perform modifications.

To see the wrapper limitations and capabilities go to
https://github.com/pruiz/WkHtmlToXSharp
To see native library capabilities go to
http://wkhtmltopdf.org/
http://wkhtmltopdf.org/libwkhtmltox/pagesettings.html
https://madalgo.au.dk/~jakobt/wkhtmltoxdoc/wkhtmltopdf-0.9.9-doc.html

The library is accessible thru nuget
https://www.nuget.org/packages/WkHtmlToXSharp/ (Main)
https://www.nuget.org/packages/WkHtmlToXSharp.Win32/ (Win32)
https://www.nuget.org/packages/WkHtmlToXSharp.Win64/ (Win64)

Because of a native library is being used, there are platform specific wrappers. The wrapper already includes the native library, and it decompressed it when the application starts up. This increases the size of the app in memory (and disk), but simplyfies deployment and distribution (A fair trade-off).

Dynamic C#

I hope that by using dynamic the template engine will have the enough independence (and simplicity) in the data source. Normally data sources for reports are unknown structures. You only define the structure when somebody asks you to create the report. In scenarios like the previously explained, dynamic fits well, since we can populate our data objects specifying “on-the-fly” properties without much code or complexity.
See Dynamic in C# 4 for more details. For a more advance use of dynamic see http://blogs.msdn.com/b/csharpfaq/archive/2009/10/19/dynamic-in-c-4-0-creating-wrappers-with-dynamicobject.aspx

Show me the code

Rather than me copying and pasting all project’s code, I’ll share what I consider are the most relevant classes and explain their goals.
The first code, it is just a fake data layer, which provides information for the report to consume. The code is in project MsDotNet.PdfGeneration.Data.

using FakeData;
using System;
using System.Collections.Generic;
using System.Dynamic;
using System.Linq;

namespace PdfGeneration.Data
{
    public class DataProvider
    {
        public dynamic GetReportData()
        {
            // Generating employee list
            var employees = Enumerable
                .Range(0, NumberData.GetNumber(10, 50))
                .Select(i =>
                   {
                       dynamic newEmployee = new ExpandoObject();
                       newEmployee.BirthDate = DateTimeData.GetDatetime(new DateTime(1973, 1, 1), new DateTime(1997, 12, 1));
                       newEmployee.FirstName = NameData.GetFirstName();
                       newEmployee.LastName = NameData.GetSurname();
                       newEmployee.Company = NameData.GetCompanyName();
                       newEmployee.Email = NetworkData.GetEmail();
                       newEmployee.PhoneNumber = PhoneNumberData.GetInternationalPhoneNumber();
                       newEmployee.Address = string.Format("{0} {1} {2}\n{3},{4} {5}", PlaceData.GetStreetName(), PlaceData.GetStreetNumber(), PlaceData.GetAddress(), PlaceData.GetCity(), PlaceData.GetState(), PlaceData.GetZipCode());
                       newEmployee.PersonalQuote = TextData.GetSentences(5);
                       // NOTE: Even though ExpandoObject is compatible with IDictionary<string,object>,
                       //       The template engine only accepts Dictionary<string,object>
                       return new Dictionary<string, object>(newEmployee);
                   })
                .ToList();

            dynamic reportData = new ExpandoObject();
            reportData.Employees = employees;
            return reportData;
        }
    }
}

Once we the data, we should pass it to our Template System (DotLiquid). The template system has three components:
1. The template file(s) (assets files and dot liquid files). (These are at the project MsDotNet.PdfGeneration.Templating
2. The Data. It’s generated by the project MsDotNet.PdfGeneration.Data.
3. The codes which joins data and template files to produce the output. The code for this is at MsDotNet.PdfGeneration.Templating
In this case, first lets take a look at each of them:

{% assign dateFormat = 'MM/dd/yyyy' %}
<!DOCTYPE html>

<html lang="en" xmlns="http://www.w3.org/1999/xhtml">
<head>
    <meta charset="utf-8" />
    <title></title>
    <link href="{{ "Assets/bootstrap.css" | ToLocalUri }}" rel="stylesheet" type="text/css" />
    <style type="text/css">

        @font-face {
            font-family: 'FontAwesome';
            src: local('FontAwesome'), url(data:font/woff;base64,{{ "Assets/fontawesome-webfont.woff" | ToBase64 }}) format('woff');
        }

        @media print {

            .page-break-after {
                page-break-after: always;
            }

            .page-break-before {
                page-break-before: always;
            }
        }

        body {
            height: 297mm;
            width: 210mm;
            margin-left: auto;
            margin-right: auto;
        }
        
    </style>
    <link href="{{ "Assets/fontawesome.css" | ToLocalUri }}" rel="stylesheet" type="text/css" />
</head>
<body>
    <h1>Report Sample</h1>
    <table class="table table-bordered">
    {% for employee in Employees %}
        <tr>
            <td>{{ employee.FirstName | HtmlEncode }} {{ employee.LastName | HtmlEncode }}</td>
            <td>{{ employee.Email | HtmlEncode }}</td>
            <td>{{ employee.PhoneNumber | HtmlEncode }}</td>
            <td>{{ employee.Address | HtmlEncode }}</td>
        </tr>
    {% endfor %}
    </table>
</body>
</html>

Other than the template file, it uses a CSS for styling and woff to provide a custom font. note that HTML syntax is standard, and we can add Dot Liquid syntax into the HTML file to support dynamic content. Please refer to Liquid Market syntax for understanding it.
In the template we are using custom filters,
HtmlEncode: Makes sure that the output is encoded to be displayed in HTML.
ToLocalUri: Converts a given relative path to an absolute path.
ToBase64: Encodes the input (a file or a text) to Base64, This is useful when using Data Uri ( https://en.wikipedia.org/wiki/Data_URI_scheme ). Data Uri are used to embed resources into the HTML, for example images, fonts, etc.

The code which handles the DotLiquidMarkup is at MsDotNet.PdfGeneration.Templating

using System;
using System.Linq;

namespace PdfGeneration.Templating.Extensibility
{
    public static class CustomFilters
    {
        public static string HtmlEncode(object input)
        {
            var htmlInput = input == null ? null : System.Net.WebUtility.HtmlEncode(input.ToString());
            return htmlInput;
        }

        public static string ToBase64(object input, string directory = null)
        {
            directory = directory ?? AppDomain.CurrentDomain.BaseDirectory;
            byte[] buffer = null;
            var inputAsFilePath = (input as string) ?? string.Empty;
            inputAsFilePath = System.IO.Path.Combine(directory, inputAsFilePath);
            if (!string.IsNullOrEmpty(inputAsFilePath) && System.IO.File.Exists(inputAsFilePath))
            {
                buffer = System.IO.File.ReadAllBytes(inputAsFilePath);
            }
            else if (input is System.Collections.Generic.IEnumerable<byte>)
            {
                var inputAsBytes = input as System.Collections.Generic.IEnumerable<byte>;
                buffer = inputAsBytes.ToArray();
            }
            else
            {
                buffer = System.Text.Encoding.Default.GetBytes(input.ToString());
            }

            if (buffer == null)
                return string.Empty;

            var base64String = Convert.ToBase64String(buffer);
            return base64String;
        }

        public static string ToLocalUri(object input, string directory = null)
        {
            directory = directory ?? AppDomain.CurrentDomain.BaseDirectory;
            var inputAsFilePath = (input as string) ?? string.Empty;
            inputAsFilePath = System.IO.Path.Combine(directory, inputAsFilePath);
            var filePathUri = new Uri(inputAsFilePath);
            return filePathUri.ToString();
        }
    }
}
using System;
using System.Collections.Generic;
using System.IO;
using System.Linq;
using System.Text;

namespace PdfGeneration.Templating
{
    public class TemplateRender
    {
        public TemplateRender()
        {
            Initialize();
        }

        private void Initialize()
        {
            DotLiquid.Template.RegisterFilter(typeof(Extensibility.CustomFilters));
            DotLiquid.Liquid.UseRubyDateFormat = false;
            DotLiquid.Template.NamingConvention = new DotLiquid.NamingConventions.CSharpNamingConvention();
        }

        public void AddKnownType(params Type[] visibleTypes)
        {
            visibleTypes = visibleTypes ?? Enumerable.Empty<Type>().ToArray();
            foreach (var type in visibleTypes)
            {
                var typeProperties = type.GetProperties();
                DotLiquid.Template.RegisterSafeType(type, typeProperties.Select(property => property.Name).ToArray());
            }
        }

        public void RenderTemplate(string templateFilePath, string htmlFilePath, dynamic model)
        {
            using (Stream htmlStream = new FileStream(htmlFilePath, FileMode.OpenOrCreate))
                RenderTemplate(templateFilePath, htmlStream, model);
        }

        public void RenderTemplate(string templateFilePath, Stream htmlStream, dynamic model, bool hasToLeaveStreamOpen = false)
        {
            using (TextWriter htmlTextWriter = new StreamWriter(htmlStream, Encoding.Default, 4096, hasToLeaveStreamOpen))
            {
                RenderTemplate(templateFilePath, htmlTextWriter, model);
            }
        }

        public void RenderTemplate(string templateFilePath, TextWriter htmlTextWriter, dynamic model)
        {
            var template = DotLiquid.Template.Parse(File.ReadAllText(templateFilePath));
            var templateRenderParameters = new DotLiquid.RenderParameters();
            var directorySeparator = Path.DirectorySeparatorChar.ToString();
            var templateDirectory = Path.GetFullPath(
                (templateFilePath.StartsWith(directorySeparator, StringComparison.InvariantCultureIgnoreCase) || templateFilePath.StartsWith("." + directorySeparator, StringComparison.InvariantCultureIgnoreCase))
                ? Path.GetDirectoryName(Path.Combine(AppDomain.CurrentDomain.BaseDirectory, templateFilePath))
                : Path.GetDirectoryName(templateFilePath)
            );

            DotLiquid.Template.FileSystem = new DotLiquid.FileSystems.LocalFileSystem(templateDirectory);
            templateRenderParameters.LocalVariables =
                model is System.Dynamic.ExpandoObject
                ? DotLiquid.Hash.FromDictionary(model as IDictionary<string, object>)
                : DotLiquid.Hash.FromAnonymousObject(model)
            ;
            template.Render(htmlTextWriter, templateRenderParameters);
            htmlTextWriter.Flush();
        }
    }
}

Now, we have the data , and some logic which creates an HTML based on a given data. The next component is at the project MsDotNet.PdfGeneration.PdfPrinting. In here an HTML is received and converted by the low level library as PDF.

using System;
using WkHtmlToXSharp;

namespace PdfGeneration.PdfPrinting
{
    // See more information about the WkHtmlTox
    // http://wkhtmltopdf.org/libwkhtmltox/pagesettings.html
    // https://madalgo.au.dk/~jakobt/wkhtmltoxdoc/wkhtmltopdf-0.9.9-doc.html

    public class HtmlToPdfPrinter
    {
        static HtmlToPdfPrinter()
        {

            WkHtmlToXLibrariesManager.Register(new Win32NativeBundle());
            WkHtmlToXLibrariesManager.Register(new Win64NativeBundle());
        }

        public void Print(string htmlFilePath, string pdfFilePath)
        {
            using (System.IO.Stream pdfStreamWriter = System.IO.File.OpenWrite(pdfFilePath))
            using (var multiplexingConverter = GetDefaultConverter(
                setUpAction: m => m.ObjectSettings.Page = new Uri(htmlFilePath).ToString()
            ))
            {
                var pdfBytes = multiplexingConverter.Convert();
                pdfStreamWriter.Write(pdfBytes, 0, pdfBytes.Length);
                pdfStreamWriter.Flush();
            }
        }

        public void Print(System.IO.Stream htmlStream, System.IO.Stream pdfStream)
        {
            using (System.IO.TextReader htmlReader = new System.IO.StreamReader(htmlStream))
            {
                Print(htmlReader, pdfStream);
            }
        }

        public void Print(System.IO.TextReader htmlReader, System.IO.Stream pdfStream)
        {
            var htmlContent = htmlReader.ReadToEnd();
            Print(htmlContent, pdfStream);
        }

        public void Print(string htmlContent, System.IO.Stream pdfStream)
        {
            using (var multiplexingConverter = GetDefaultConverter())
            {
                var pdfBytes = multiplexingConverter.Convert(htmlContent);
                pdfStream.Write(pdfBytes, 0, pdfBytes.Length);
                pdfStream.Flush();
            }
        }

        private IHtmlToPdfConverter GetDefaultConverter(Action<IHtmlToPdfConverter> setUpAction = null)
        {
            var multiplexingConverter = new MultiplexingConverter();
            multiplexingConverter.ObjectSettings.Web.PrintMediaType = true;
            multiplexingConverter.GlobalSettings.Margin.Top = "1.25cm";
            multiplexingConverter.GlobalSettings.Margin.Bottom = "1.25cm";
            multiplexingConverter.GlobalSettings.Margin.Left = "1.25cm";
            multiplexingConverter.GlobalSettings.Margin.Right = "1.25cm";

            multiplexingConverter.ObjectSettings.Load.BlockLocalFileAccess = false;
            multiplexingConverter.ObjectSettings.Web.LoadImages = true;
            multiplexingConverter.ObjectSettings.Web.PrintMediaType = true;

            if (setUpAction != null)
                setUpAction(multiplexingConverter);
            return multiplexingConverter;
        }
    }
}

NOTE Please notice that WkHtmlToXSharp requires you to register the native dll, to make sure this happens once the previous code does it at the static constructor.

Now we have everything we need to generate PDF report. A goal partial on this example, was to hide the libraries, in a way that you could replace components (e.g. you want to use razor engine instead of DotLiquidMarkup). For doing this, each project exposes only primitive and built-in types in .NET. Thus, to communicate different modules and dealing with text files, it has been use the most common types: String, TextWriter,TextReader and Stream.

See all the components working together at the main app:

using PdfGeneration.Data;
using PdfGeneration.PdfPrinting;
using PdfGeneration.Templating;
using System;

namespace PdfGeneration
{
    class Program
    {
        static void Main(string[] args)
        {
            var dataProvider = new DataProvider();
            var templateRender = new TemplateRender();
            var htmlToPdfPrinter = new HtmlToPdfPrinter();
            templateRender.AddKnownType();
            var workingDirectory = AppDomain.CurrentDomain.BaseDirectory;
            var pdfFilePath = System.IO.Path.Combine(workingDirectory, @"Report.pdf");
            var templateFilePath = System.IO.Path.Combine(workingDirectory, @"Assets/Report.html");
            var templateDirectoryPath = System.IO.Path.GetDirectoryName(templateFilePath);

            if (System.IO.File.Exists(pdfFilePath))
                System.IO.File.Delete(pdfFilePath);

            dynamic reportData = dataProvider.GetReportData();

            #region Printing Using Stream
            using (System.IO.Stream htmlStream = new System.IO.MemoryStream())
            {
                templateRender.RenderTemplate(templateFilePath, htmlStream, reportData, hasToLeaveStreamOpen: true);
                htmlStream.Seek(0, System.IO.SeekOrigin.Begin);
                using (var pdfStreamWriter = System.IO.File.OpenWrite(pdfFilePath))
                {
                    htmlToPdfPrinter.Print(htmlStream, pdfStreamWriter);
                }
            }
            #endregion

            //#region Printing Using StringBuilder
            //var htmlStringBuilder = new StringBuilder();
            //using (System.IO.TextWriter htmlTextWriter = new System.IO.StringWriter(htmlStringBuilder))
            //{
            //    templateRender.RenderTemplate(templateFilePath, htmlTextWriter, reportData);
            //}
            //using (var pdfStreamWriter = System.IO.File.OpenWrite(pdfFilePath))
            //{
            //    var htmlContent = htmlStringBuilder.ToString();
            //    htmlToPdfPrinter.Print(htmlContent, pdfStreamWriter);
            //}
            //#endregion

            System.Diagnostics.Process.Start(pdfFilePath);
        }
    }
}

I have to admit that this problem is very interesting to resolve and there are many alternatives, my approach strives to be simple and cheap. There are remarks which should be taken into account. Here is a simple result (without any effort on the CSS part)
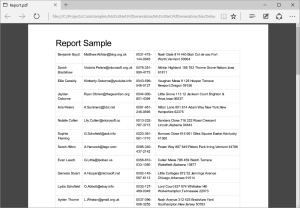
MsDotNet PdfGeneration Capture

The code is at
https://github.com/hmadrigal/playground-dotnet/tree/master/MsDotNet.PdfGeneration

Happy coding!
Using JQuery DataTables , Entity Framework (EF) and Dynamic LINQ in conjunction


The Problem

Few months ago I started using DataTables (A plugin for JQuery in order to create neat tables in HTML). However, I noticed that twice I wrote code kind of similar for addressing the same issue. Thus with this project I’d like to set a base for extensible code which deals with the common request and response work related to DataTable API. The goal is to quickly provide an endpoint which provides data compatible with DataTable data source.
All the filtering, sorting and projection should happen at server side.

For this solution I’ll use the following components:
DataTables see https://www.datatables.net/
Dynamic LINQ see http://dynamiclinq.azurewebsites.net/

My project is inspired by https://github.com/kendo-labs/dlinq-helpers. Kendo Grid is a very robust table for HTML.

Remarks

– Filtering logic has not been taking into consideration, mainly because I didn’t find a common mechanism for receive filter information at server side. If this is a requirement, I will consider to mimic Kendo UI protocol for sending filtering information.
– Order and Search have been implemented
– Implementations for Array of Array and Array of Objects have been provided, however the developer is responsible of calling the proper methods.

The Solution

First of all The idea is to create an extensible module. At this time the filtering logic is pending to really have a useful. Thus I will start by showing the code of the DataTables module. The following code holds the models used by the model these classes are basically POCOS to be used to receive or send information.

using System.Runtime.Serialization;

namespace DataTables.Models
{
    /// <summary>
    /// Holds the information required for a given column
    /// </summary>
    [DataContract]
    public class ColumnRequest
    {
        /// <summary>
        /// Specific search information for the column
        /// </summary>
        [DataMember(Name = "search")]
        public SearchRequest Search { get; set; }

        /// <summary>
        /// Column's data source, as defined by columns.data.
        /// </summary>
        [DataMember(Name = "data")]
        public string Data { get; set; }

        /// <summary>
        /// Column's name, as defined by columns.name.
        /// </summary>
        [DataMember(Name = "name")]
        public string Name { get; set; }

        /// <summary>
        /// Flag to indicate if this column is search-able (true) or not (false). This is controlled by columns.searchable.
        /// </summary>
        [DataMember(Name = "searchable")]
        public bool? Searchable { get; set; }

        /// <summary>
        /// Flag to indicate if this column is orderable (true) or not (false). This is controlled by columns.orderable.
        /// </summary>
        [DataMember(Name = "orderable")]
        public bool? Orderable { get; set; }

    }
}
using System;
using System.Collections.Generic;
using System.Linq;
using System.Runtime.Serialization;

namespace DataTables.Models
{
    /// <summary>
    /// 
    /// </summary>
    [DataContract]
    public class SearchRequest
    {
        /// <summary>
        /// Search value
        /// </summary>
        [DataMember(Name = "value")]
        public string Value { get; set; }

        /// <summary>
        /// true if the search value should be treated as a regular expression for advanced searching, false otherwise. 
        /// </summary>
        [DataMember(Name = "regex")]
        public bool Regex { get; set; }

        public virtual string Operator { get; set; }

        public SearchRequest()
        {
            Operator = @"contains";
        }

        private static readonly IDictionary<string, string> operators = new Dictionary<string, string>
        {
            {"eq", "="},
            {"neq", "!="},
            {"lt", "<"},
            {"lte", "<="},
            {"gt", ">"},
            {"gte", ">="},
            {"startswith", "StartsWith"},
            {"endswith", "EndsWith"},
            {"contains", "Contains"},
            {"doesnotcontain", "Contains"}
        };

        public virtual string ToExpression(DataTableRequest request)
        {
            if (Regex)
                throw new NotImplementedException("Regular Expression is not implemented");

            string comparison = operators[Operator];
            List<string> expressions = new List<string>();
            foreach (var searchableColumn in request.Columns.Where(c => c.Searchable.HasValue && c.Searchable.Value))
            {
                if (Operator == "doesnotcontain")
                {
                    expressions.Add(string.Format("!{0}.ToString().{1}(\"{2}\")", searchableColumn.Data, comparison, Value));
                }
                else if (comparison == "StartsWith" || comparison == "EndsWith" || comparison == "Contains")
                {
                    expressions.Add(string.Format("{0}.ToString().{1}(\"{2}\")", searchableColumn.Data, comparison, Value));
                }
                else
                {
                    expressions.Add(string.Format("{0} {1} \"{2}\"", searchableColumn.Data, comparison, Value));
                }
            }
            return string.Join(" or ", expressions);
        }
    }
}

using System.Runtime.Serialization;

namespace DataTables.Models
{
    /// <summary>
    /// Contains the information about the sort request
    /// </summary>
    [DataContract]
    public class OrderRequest
    {
        /// <summary>
        /// Indicates the orientation of the sort "asc" for ascending or "desc" for desc
        /// </summary>
        [DataMember(Name = "dir")]
        public string Dir { get; set; }

        /// <summary>
        /// Column which contains the number of column which requires this sort.
        /// </summary>
        [DataMember(Name = "column")]
        public int? Column { get; set; }

        public string ToExpression(DataTableRequest request)
        {
            return string.Concat(request.Columns[Column.Value].Data, " ", Dir);
        }
    }
}


using System.Collections;
using System.Runtime.Serialization;

namespace DataTables.Models
{
    /// <summary>
    /// Encapsulates a Data Table response format
    /// </summary>
    /// <typeparam name="TData"></typeparam>
    [DataContract]
    public class DataTableResponse 
    {
        /// <summary>
        /// The draw counter that this object is a response to - from the draw parameter sent as part of the data request. Note that it is strongly recommended for security reasons that you cast this parameter to an integer, rather than simply echoing back to the client what it sent in the draw parameter, in order to prevent Cross Site Scripting (XSS) attacks.
        /// </summary>
        [DataMember(Name = "draw")]
        public int? Draw { get; set; }

        /// <summary>
        /// The data to be displayed in the table. 
        /// <remarks>
        /// This is an array of data source objects, one for each row, which will be used by DataTables. 
        /// Note that this parameter's name can be changed using the ajax option's dataSrc property.
        /// </remarks>
        /// </summary>
        [DataMember(Name = "data")]
        public IEnumerable Data { get; set; }

        /// <summary>
        /// Total records, before filtering (i.e. the total number of records in the database)
        /// </summary>
        [DataMember(Name = "recordsTotal")]
        public int? RecordsTotal { get; set; }

        /// <summary>
        /// Total records, after filtering (i.e. the total number of records after filtering has been applied - not just the number of records being returned for this page of data).
        /// </summary>
        [DataMember(Name = "recordsFiltered")]
        public int? RecordsFiltered { get; set; }

        /// <summary>
        /// Optional: If an error occurs during the running of the server-side processing script, you can inform the user of this error by passing back the error message to be displayed using this parameter. Do not include if there is no error.
        /// </summary>
        [DataMember(Name = "error")]
        public string Error { get; set; }
    }
}

using System.Collections.Generic;
using System.Runtime.Serialization;

namespace DataTables.Models
{
    /// <summary>
    /// This class holds the minimum amount of information provided by DataTable to perform a request on server side.
    /// </summary>
    [DataContract]
    public class DataTableRequest
    {
        /// <summary>
        /// Column data request description
        /// </summary>
        [DataMember(Name = "columns")]
        public List<ColumnRequest> Columns { get; set; }

        /// <summary>
        /// Column requested order description
        /// </summary>
        [DataMember(Name = "order")]
        public List<OrderRequest> Order { get; set; }

        /// <summary>
        /// Global search value. To be applied to all columns which have search-able as true.
        /// </summary>
        [DataMember(Name = "search")]
        public SearchRequest Search { get; set; }

        /// <summary>
        /// Paging first record indicator. This is the start point in the current data set (0 index based - i.e. 0 is the first record).
        /// </summary>
        [DataMember(Name = "start")]
        public int? Start { get; set; }

        /// <summary>
        /// Number of records that the table can display in the current draw. It is expected that the number of records returned will be equal to this number, unless the server has fewer records to return. 
        /// </summary>
        [DataMember(Name = "length")]
        public int? Length { get; set; }

        /// <summary>
        /// Draw counter. This is used by DataTables to ensure that the Ajax returns from server-side processing requests are drawn in sequence by DataTables (Ajax requests are asynchronous and thus can return out of sequence). 
        /// This is used as part of the draw return parameter. 
        /// </summary>
        [DataMember(Name = "draw")]
        public int? Draw { get; set; }
    }
}

They way I have decided to implement logic is through extension methods.

using System;
using System.Collections.Generic;
using System.Linq;
using System.Linq.Dynamic;
using DataTables.Models;

namespace DataTables.Extensions
{
    public static class IQueryableExtensions
    {
        /// <summary>
        /// Computes a DataTables response based on the request. This response is compatible with an array of arrays
        /// </summary>
        /// <remarks>
        /// This response is compatible with an array of arrays
        /// </remarks>
        /// <typeparam name="TEntity">Entity to be returned in the data</typeparam>
        /// <param name="query">Initial data source. It will be part of the response after computations</param>
        /// <param name="request">Holds information about the request</param>
        /// <param name="getEntityFieldNamesFunc">Function which provides a sequence of fields of the entity to be used</param>
        /// <param name="getEntityAsEnumerableFunc">Function which converts an entity to an array</param>
        /// <returns></returns>
        public static DataTableResponse GetDataTableResponse<TEntity>(this IEnumerable<TEntity> query, DataTableRequest request,
            Func<TEntity, IEnumerable<string>> getEntityFieldNamesFunc, Func<TEntity, System.Collections.IEnumerable> getEntityAsEnumerableFunc)
        {
            // When using Arrays set the columns data before performing operations.
            SetColumnData(request, getEntityFieldNamesFunc);

            var response = GetDataTableResponse(ref query, request);

            // Converts the result compatible with an array (required by default for DataTables)
            response.Data = query.Select(getEntityAsEnumerableFunc);
            return response;
        }

        /// <summary>
        /// Computes a DataTables response based on the request. This response is compatible with an array of objects.
        /// </summary>
        /// <remarks>
        /// This response is compatible with an array of objects.
        /// </remarks>
        /// <typeparam name="TEntity">Entity to be returned in the data</typeparam>
        /// <param name="query">Initial data source. It will be part of the response after computations</param>
        /// <param name="request">Holds information about the request</param>
        /// <returns></returns>
        public static DataTableResponse GetDataTableResponse<TEntity>(this IEnumerable<TEntity> query, DataTableRequest request)
        {
            // When using Arrays set the columns data before performing operations.
            var response = GetDataTableResponse(ref query, request);

            // Converts the result compatible with an array (required by default for DataTables)
            response.Data = query;
            return response;
        }

        private static DataTableResponse GetDataTableResponse<TEntity>(ref IEnumerable<TEntity> query, DataTableRequest request)
        {
            var response = new DataTableResponse();
            // Setting up response
            response.Draw = request.Draw;
            response.RecordsTotal = query.Count();

            // sorting
            query = query.OrderBy(string.Join(",", request.Order.Select(o => o.ToExpression(request))));

            // search
            if (request.Search != null && !string.IsNullOrEmpty(request.Search.Value))
            {
                query = query.Where(request.Search.ToExpression(request));
            }

            // filtering


            // Counting results
            response.RecordsFiltered = query.Count();

            // Returning page (subset of filtered records)
            if (request.Start.HasValue && request.Start.Value > 0)
                query = query.Skip(request.Start.Value);
            if (request.Length.HasValue && request.Length.Value >= 0)
                query = query.Take(request.Length.Value);
            return response;
        }

        private static void SetColumnData<TEntity>(DataTableRequest request, Func<TEntity, IEnumerable<string>> func)
        {
            SetColumnData(request, func(default(TEntity)).ToArray());
        }

        private static void SetColumnData(DataTableRequest request, params string[] fields)
        {
            for (int index = 0; index < fields.Length && index < request.Columns.Count; index++)
            {
                var fieldIndex = 0;
                if (int.TryParse(request.Columns[index].Data, out fieldIndex))
                    request.Columns[index].Data = fields[fieldIndex];
            }
        }
    }
}

The previous code takes advantage Dynamic LINQ to compute queries, and using as input the request information. With the previous code in place, we can use in our Controller the following code:

using DataTableSample.Services;
using DataTables.Models;
using DataTableSample.Models;
using System.Linq.Dynamic;
using DataTables.Extensions;

namespace DataTableSample.Controllers
{
    public class EmployeesController : ApiController
    {
        private CompanyModel db = new CompanyModel();

        // GET: api/Employees
        public async Task<IHttpActionResult> GetEmployees([FromUri]DataTableRequest request)
        {
            var isUsingArrayOfArrays = request.Columns.Where(c => { var n = 0; return int.TryParse(c.Data, out n); }).Any();
            var response = isUsingArrayOfArrays
                ? db.Employees.AsNoTracking().AsQueryable().GetDataTableResponse(request, GetEntityFieldNames, GetEntityAsEnumerable)
                : db.Employees.AsNoTracking().AsQueryable().GetDataTableResponse(request)
                ;
            return Json(response);
        }

        /// <summary>
        /// Converts the Entity to a sequence of values (an Array)
        /// </summary>
        /// <param name="e"></param>
        /// <returns></returns>
        private System.Collections.IEnumerable GetEntityAsEnumerable(Employee e)
        {
            yield return e.FirstName;
            yield return e.LastName;
            yield return e.Position;
            yield return e.Office;
            yield return e.StartDate;
            yield return e.Salary;
        }

        /// <summary>
        /// Provides the name of the Columns used in the Array
        /// </summary>
        /// <param name="e"></param>
        /// <returns></returns>
        private IEnumerable<string> GetEntityFieldNames(Employee e)
        {
            yield return nameof(e.FirstName);
            yield return nameof(e.LastName);
            yield return nameof(e.Position);
            yield return nameof(e.Office);
            yield return nameof(e.StartDate);
            yield return nameof(e.Salary);
        }
    }
}

The last portion of code is

<!DOCTYPE html>
<html>
<head>
    <title></title>
    <link rel="stylesheet" type="text/css" href="https://cdn.datatables.net/1.10.9/css/jquery.dataTables.min.css" />
    <meta charset="utf-8" />
</head>
<body>
    <h1>Using Objects</h1>
    <table id="example1" class="display" cellspacing="0" style="width:100%;">
        <thead>
            <tr>
                <th>First name</th>
                <th>Last name</th>
                <th>Position</th>
                <th>Office</th>
                <th>Start date</th>
                <th>Salary</th>
            </tr>
        </thead>
        <tfoot>
            <tr>
                <th>First name</th>
                <th>Last name</th>
                <th>Position</th>
                <th>Office</th>
                <th>Start date</th>
                <th>Salary</th>
            </tr>
        </tfoot>
    </table>
    <h1>Using Arrays</h1>
    <table id="example2" class="display" cellspacing="0" style="width:100%;">
        <thead>
            <tr>
                <th>First name</th>
                <th>Last name</th>
                <th>Position</th>
                <th>Office</th>
                <th>Start date</th>
                <th>Salary</th>
            </tr>
        </thead>
        <tfoot>
            <tr>
                <th>First name</th>
                <th>Last name</th>
                <th>Position</th>
                <th>Office</th>
                <th>Start date</th>
                <th>Salary</th>
            </tr>
        </tfoot>
    </table>
</body>
</html>
<script src="Scripts/jquery-1.7.js"></script>
<script src="Scripts/DataTables/jquery.dataTables.js"></script>
<script type="text/javascript">
    $(document).ready(function () {
        $('#example1').DataTable({
            "processing": true,
            "serverSide": true,
            "ajax": "api/Employees",
            "columns": [
                { "data": "FirstName" },
                { "data": "LastName" },
                { "data": "Position" },
                { "data": "Office" },
                { "data": "StartDate" },
                { "data": "Salary" }
            ]
        });

        $('#example2').DataTable({
            "processing": true,
            "serverSide": true,
            "ajax": "api/Employees"
        });
    });
</script>

By running the application the two tables will be populated, one of them will be using Array of Arrays and the second will be using an Array of objects.

The full source code can be downloaded from:
https://github.com/hmadrigal/playground-dotnet/tree/master/MsWebApi.DataTables

Cheers,
Herb

Generating like-JIRA tickets using Entity Framework (EF6) and MS SQL (TSQL)


The problem

We have a Master/Detail relationship with two entities, and we want to identify detail records by using a friendly ID. The friendly ID is based on a master code (which it is specified in the Master Table) and a Detail Number (which works like a counter on each given master code). For example

Master Table ( When IsAutoGen is 1, then Details should auto generate an friendly ID using the AutoGenPrefix)

Id          IsAutoGen AutoGenPrefix
----------- --------- -------------
1           1         GRPA
2           1         GRPB
5           0         NULL

Detail table AutoGenPreix-AutoGenNumber identify uniquely each ticket by providing a friendly-auto-Incremental Id.

Id          MasterId    AutoGenPrefix AutoGenNumber
----------- ----------- ------------- -------------
361         1           GRPA          1
362         2           GRPB          1
363         5           NULL          1
364         1           GRPA          2
365         2           GRPB          2
366         5           NULL          2
367         1           GRPA          3
368         2           GRPB          3

Remarks

Certainly this problem may have many different solutions. For example it is technically possible to do all the computations only using C# and Entity Framework, thread locks and database transactions to support concurrency. However by doing it so, the developer will be responsible for dealing with concurrency, it will lock the database for longer periods since changes happens at business logic layer. Thus, this approach attempts to delegate the concurrency handling task to the database engine and reduce the lock time when possible. This solution is very particular to Entity Framework and Microsoft SQL, although ORMs and Triggers are concepts available in most of the platforms nowadays.

The solution

Just in case, you have skipped the test before, I encourage you to read the remarks. That said, First lets create our sample tables by using the following T-SQL script:

CREATE TABLE [dbo].[Master] (
    [Id]            INT         IDENTITY (1, 1) NOT NULL,
    [IsAutoGen]     BIT         CONSTRAINT [DF_Master_IsAutoGen] DEFAULT ((0)) NOT NULL,
    [AutoGenPrefix] VARCHAR (5) NULL,
    CONSTRAINT [PK_Master] PRIMARY KEY CLUSTERED ([Id] ASC)
);
GO
CREATE TABLE [dbo].[Detail] (
    [Id]            INT         IDENTITY (1, 1) NOT NULL,
    [MasterId]      INT         NOT NULL,
    [AutoGenPrefix] VARCHAR (5) NULL,
    [AutoGenNumber] INT         NULL,
    CONSTRAINT [PK_Detail] PRIMARY KEY CLUSTERED ([Id] ASC),
    CONSTRAINT [FK_Detail_Master] FOREIGN KEY ([MasterId]) REFERENCES [dbo].[Master] ([Id])
);
GO

As simple as two tables, in order to establish a master-detail relationship. Now with the same ease, lets see the suggested trigger:

CREATE TRIGGER  [dbo].[Insert_Detail_ReadableId]
ON [dbo].[Detail]
INSTEAD OF INSERT
AS
BEGIN
   SET NOCOUNT OFF;
	INSERT INTO [Detail] ([MasterId],[AutoGenPrefix], [AutoGenNumber])
	SELECT 
		I.[MasterId] AS [MasterId],
		M2.AutoGenPrefix AS [AutoGenPrefix],
		ISNULL(ROW_NUMBER() OVER(ORDER BY I.[Id]) + M.[AutoGenNumber],1) AS [AutoGenNumber]
	FROM INSERTED  I
	LEFT JOIN [Master] M2 ON I.[MasterId] = M2.[Id]
	LEFT JOIN (
		SELECT 
			[MasterId],
			MAX(ISNULL([AutoGenNumber],0)) AS [AutoGenNumber]
		FROM [AutoGenDB].[dbo].[Detail]
		GROUP BY [MasterId]
	) M ON I.[MasterId] = M.[MasterId]

	SELECT [Id] FROM [Detail] WHERE @@ROWCOUNT > 0 AND [Id] = SCOPE_IDENTITY();
END

Notice that the trigger is responsible of performing the INSERT since it has been configured to be INSTEAD OF INSERT. The triggers uses the INSERTED variable to hold a table with all the records that should have been inserted. Thus the application performs a INSERT INTO using as data source the INSERTED table, the inserted max AutoGenNumber per AutoGenPrefix and a row number to be added to the Max AutoGenNumber.
Pay attention to the last line, which returns the inserted ID, this is required by Entity Framework to detect as successful the INSERT operation (see StackOverflow | OptimisticConcurrencyException — SQL 2008 R2 Instead of Insert Trigger with Entity Framework or StackOverflow | error when inserting into table having instead of trigger from entity data framework )

This is all we need in the TSQL level. Every time we attempt to INSERT a new record, right after the INSERT request, our code will perform the inserted by computing some additional data.

In our C# code, I’ll assume we’re using an EDMX file and using DB first approach. Thus, we usually only update our DbContext by updating our models from Visual Studio (VS).

using System;
using System.Collections.Generic;
using System.ComponentModel.DataAnnotations.Schema;
using System.Data.Entity.Infrastructure;
using System.Linq;
using System.Text;
using System.Threading.Tasks;

namespace AutoGenDB
{
    class Program
    {
        static void Main(string[] args)
        {
            using (var context = new AutoGenDB.AutoGenDBEntities())
            {
                // if master table is empty, then it inserts some master records.
                if (!context.Masters.Any())
                {
                    for (int masterIndex = 0; masterIndex < 5; masterIndex++)
                    {
                        var isAutoGenEnabled = masterIndex % 2 == 0;
                        var newMaster = new Master { IsAutoGen = isAutoGenEnabled, AutoGenPrefix = isAutoGenEnabled ? "GRP" + Convert.ToChar((masterIndex % 65) + 65) : default(string) };
                        context.Masters.Add(newMaster);
                    }
                    context.SaveChanges();
                }

                // Inserts some details on different groups
                List<Detail> details = new List<Detail>();
                List<Master> masters = context.Masters.AsNoTracking().ToList();
                for (int i = 0; i < 100; i++)
                {
                    var masterId = masters[i % masters.Count].Id;
                    details.Add(new Detail() { MasterId = masterId });
                }
                context.Details.AddRange(details);
                context.SaveChanges();

                // Prints 10 auto generated IDS
                foreach (var master in context.Masters.AsNoTracking().Take(3))
                    foreach (var detail in master.Details.Take(5))
                        Console.WriteLine(master.IsAutoGen ? "Ticket:{0}-{1}" : @"N/A", detail.AutoGenPrefix, detail.AutoGenNumber);
            }
            Console.ReadKey();
        }
    }
}

The previous C# code inserts some records and prints the information generated by the Trigger. At this point there is only one missed component.
If we run the code as it is. The application won’t load the auto generated values, this is because Entity Framework does not know that these columns were populated. An option is to instruct Entity Framework about when it should reload the entities. The following code, decorates the Detail class with an IDetail interface which can be used in the DbContext to identify the entity type that should be reloaded.

using System;
using System.Collections.Generic;
using System.Data.Entity;
using System.Linq;
using System.Text;
using System.Threading.Tasks;
namespace AutoGenDB
{
    interface IDetail
    {
        int? AutoGenNumber { get; set; }
        string AutoGenPrefix { get; set; }
        int Id { get; set; }
        Master Master { get; set; }
        int MasterId { get; set; }
    }

    public partial class AutoGenDBEntities : DbContext
    {
        public override int SaveChanges()
        {
            var entriesToReload = ChangeTracker.Entries<IDetail>().Where(e => e.State == EntityState.Added).ToList();
            int rowCount = base.SaveChanges();
            if (rowCount > 0 && entriesToReload.Count > 0)
                entriesToReload.ForEach(e => e.Reload());
            return rowCount;
        }

    }

    public partial class Detail : AutoGenDB.IDetail
    {

    }
}

Please notice how the subclass of the DbContext is overriding the SaveChanges method in order to request to reload the instances of IDetail. Reloading entities may or may not be desirable in depending on the application.
With these overrides, the DbContext will know when a given entity should be reloaded.

As usual the code sample can be check at https://github.com/hmadrigal/playground-dotnet/tree/master/MsDotNet.EntityFrameworkAndTriggers

Pivot ( or Panorama ) Index Indicator


Hello,

The Problem:

Creating a pivot (or panorama) indicator could be a challenging task. The control should:

  • Indicate in which item of the collection you are looking at
  • Let you tap on a given item and navigate in the panorama to that given item
  • Let you customize the look and feel of the items.

The Solution: A Second thought

Sounds like the perfect scenario for a custom control, and in some of the cases it is. However, after some minutes thinking about this idea, I realized that the ListBox supports most of these requirements but only one pending task: it has to interact properly with the Panorama or Pivot.  Thus, the current solution uses a ListBox (Custom Styles and Templates) for modifying the look and file, and prepares a behavior (more specifically a TargetedTriggeredAction<T1,T2> ) for letting the ListBox interact with a index based collection (e.g. Pivot, Panorama, ListBox, etc … ).

A behavior …  (What’s that?)

Well with XAML a bunch of new concepts arrived to .NET development world. One in particular which is very useful is a behavior . You can think about a behavior like a encapsulated functionality that can be reused on different context under the same type of items.  The most popular behavior i guess it is EventToCommand which can be applied to any FrameworkElement and it maps the Loaded Event to a Command when implementing a View Model.

Thus, since We have a ListBox already in place, we only want it to behave synchronized with a Pivot or Panorama. Thus, the external control will be a parameter for our behavior.

    [TypeConstraint(typeof(Selector))]
    public class SetSelectedItemAction : TargetedTriggerAction
    {
        private Selector _selector;

        protected override void OnAttached()
        {
            base.OnAttached();

            _selector = AssociatedObject as Selector;
            if (_selector == null)
                return;
        }

        protected override void OnDetaching()
        {
            base.OnDetaching();
            if (_selector == null)
                return;
            _selector = null;
        }

        protected override void Invoke(object parameter)
        {
            if (_selector == null)
                return;

            if (Target is Panorama)
                InvokeOnPanorama(Target as Panorama);
            if (Target is Pivot)
                InvokeOnPivot(Target as Pivot);
            if (Target is Selector)
                InvokeOnSelector(Target as Selector);
        }

        private void InvokeOnSelector(Selector selector)
        {
            if (selector == null)
                return;
            selector.SelectedIndex = _selector.SelectedIndex;
        }

        private void InvokeOnPivot(Pivot pivot)
        {
            if (pivot == null)
                return;
            pivot.SelectedIndex = _selector.SelectedIndex;
        }

        private void InvokeOnPanorama(Panorama panorama)
        {
            if (panorama == null)
                return;
            panorama.DefaultItem = panorama.Items[_selector.SelectedIndex];
        }

The idea is that you should be able to sync other elements by just dropping this behavior on a ListBox and setting up few properties, for example:

<ListBox
            x:Name="listbox"
			HorizontalAlignment="Stretch" Margin="12" VerticalAlignment="Top"
            SelectedIndex="{Binding SelectedIndex,ElementName=panorama,Mode=TwoWay}"
            ItemsSource="{Binding PanoramaItems}"
            ItemsPanel="{StaticResource HorizontalPanelTemplate}"
            ItemContainerStyle="{StaticResource ListBoxItemStyle1}"
            ItemTemplate="{StaticResource IndexIndicatorDataTemplate}"
            >
            <i:Interaction.Triggers>
                <i:EventTrigger EventName="SelectionChanged">
                    <local:SetSelectedItemAction TargetObject="{Binding ElementName=panorama}"/>
                </i:EventTrigger>
            </i:Interaction.Triggers>
        </ListBox>

The behaviors can take more responsibility other than keep sync the selected item in one way. However my design decision was to use other mechanisms for keeping sync the indexes. (e.g. you could appreciate a TwoWay binding using SelectedIndex Property of the Target Pivot or Panorama).

Also, the ListBox has bound a list of items (empty items) just for being able to generate as much items as the Panorama has. This is other logic that may be moved to the behavior (however in my two previous attempts it didn’t work that well).

Here is the code sample, of this simple behavior and how ti keeps sync with the Panorama.

https://github.com/hmadrigal/playground-dotnet/tree/master/MsWinPhone.ParanoramaIndex

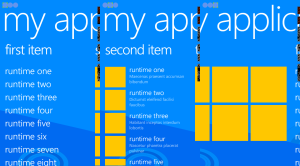
The following screenshot shows an indicator in the top/left corner where you can see the current tab of the Panorama that is being shown. Moreover, the user can tap on a given item to get directly to that selected tab.

Panorama_Index_Indicator

Cheers
Herb

Custom Configuration files in .NET


Hi,

I would like to share some ideas about how to deal with configuration files on .NET. I am sure that there should be many options for implementing configuration files. Some are more likely to better than others and others may depend on the platform (e.g. mobile, desktop, cloud, etc..)  In particular I’ll explain an approach that should be working for your Web Application and for your Desktop application.

The problem:

We want to quickly create a configuration file, since we foresee that our application will have a good amount of settings.

Solution:

I’ll take advantage of the default .NET mechanism for configuration files. It’s plenty flexible and quite extensible. The major drawback is that you’ll have to write code, and sometimes a not-so-easy code. Alternatively you can relay on the existent section handlers, and try to use them when possible.

A brief talk about configuration files

.NET configuration files supports hierarchies and they are extensible. Almost all the cases with defaults is fairly enough, for creating custom sections there I will be explaining three approaches, but certainly there are more. The decision of which approach to take it will depend of how much time you have and also if the team has the will and chance for installing at least the Configuration Section Designer. 

1) Create Custom Section Handler with Code Snippets

This is the simplest one, it’s basically get code snippets of how to create sections for the SectionHandler class. Then you are more likely to have many property of similar times (probably primitive types) but it can safe time for producing the class and understand it. I won’t be providing samples for this.

2) Using the Custom Section Designer from CodePlex at https://csd.codeplex.com/

This is my favorite, but unfortunately it demands that you will have to install a Visual Studio Extension for opening configuration section projects. The best of this approach is that you can get:

  • XSD validation + intelisense
  • XSD Documentation
  • Ease to modify content.
  • etc…

First get proper installer for the extension https://csd.codeplex.com/. Then create a configuration section project (these projects outputs a dll), by conversion these projects end with “.Configuration” for example “MyApp.Configuration” will be dll project that loads the configuration section. In our sample it is provided a project called: ConfigurationFileSample.Configuration

Image

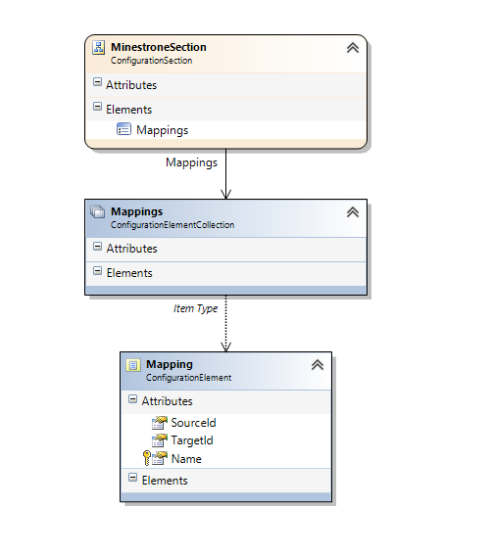
The previous screenshot exemplifies a Section in which it has been defined a Element called Mappings, which is a collection of Mapping elements. By following the instructions at https://csd.codeplex.com/wikipage?title=Defining%20new%20types&referringTitle=Usage you will easily create this configuration. The magic arrive when you are typing these values into visual studio (or any XML editor that supports XSD validation property).

Once you are done designing your configuration file. You save and compile. If it success then add a configuration file to your main project, and also add a reference to the configuration file project. for referencing our custom section we do it into the configSections element. For example:


<!-- NOTE: In here a custom section is specified, this section has been created by writing code--></pre>
<section></section>
<pre>

Visual studio will enable help toltips and XSD validation for you. As you can see in the following screenshot

ConfigurationTooltip

For loading configuration files in code, after adding the reference to the dll, the app can use an static helper of simply use the GetSection method.

For example for loading the section using the default instance:

// NOTE: It is also possible to load the default custom section
Console.WriteLine("\nLoading default Minestrone thru singleton!");
var minestroneSection = Minestrone.MinestroneSection.Instance;
PrintMinestrone(minestroneSection);

Or also you could load a specific section:

// NOTE: You could ask for a given custom section
Console.WriteLine("\nLoading Minestrone by manually specifying a section: minestroneSection");
var minestroneSection = ConfigurationManager.GetSection("minestroneSection") as Minestrone.MinestroneSection;
PrintMinestrone(minestroneSection);

3) Using one of the build in Section Handlers
As I mentioned you also could you the built-in Sectionhandlers from .NET framework There is a list of them at the end of this page: http://msdn.microsoft.com/en-us/library/system.configuration.configurationsection.aspx (basically all the subclasses of System.Configuration.ConfigurationSection )

For example for referencing it into the configuration file:


    <!-- NOTE:This custom section uses .NET framework sections instead, see http://msdn.microsoft.com/en-us/library/system.configuration.configurationsection.aspx for a list of the classes available into the framework --></pre>
<section></section>
<pre>

and for loading it from code:

// NOTE: Loads a custom section, but it uses a .NET built-in class
            Console.WriteLine("\nLoading a ApplicationSettings using a built-in .NET type. (more at http://msdn.microsoft.com/en-us/library/system.configuration.configurationsection.aspx ) ");
            var myConfigSection = ConfigurationManager.GetSection("myConfigSection") as System.Collections.Specialized.NameValueCollection;
            for (int appSettingIndex = 0; appSettingIndex < myConfigSection.Count; appSettingIndex++)
            {
                Console.WriteLine(string.Format("Key:{0} Value:{1}", myConfigSection.AllKeys[appSettingIndex], myConfigSection[appSettingIndex]));
            }
            Console.WriteLine("\n\n PRESS ANY KEY TO FINISH! ");
            Console.ReadKey();

We are almost there, but WAIT!!!!

I know that at this time I haven’t shown how to specify section. Well basically because you can provide the details of the section inline into the same file or specifcying an external file using the configSource attribute (which is available for any custom section).

For example see how the minestroneSection is defined in an external file, and how myConfigSection  is written inline into the configuration file. There are advantages of each approach (e.g. when you want to apply XSLT transformations you may want to apply transformations to a simple file rather than a long and complex XML) o perhaps you may have a config file per environment (e.g. minestrone.debug.config…,)

<?xml version="1.0" encoding="utf-8" ?>
<configuration>
  <configSections>
    <!-- NOTE: In here a custom section is specified, this section has been created by writing code-->
    <section name="minestroneSection" type="Minestrone.MinestroneSection, ConfigurationFileSample.Configuration, Version=1.0.0.0, Culture=neutral, PublicKeyToken=null"/>

    <!-- NOTE:This custom section uses .NET framework sections instead, see http://msdn.microsoft.com/en-us/library/system.configuration.configurationsection.aspx for a list of the classes available into the framework -->
    <section name="myConfigSection" type="System.Configuration.AppSettingsSection, System.Configuration, Version=4.0.0.0, Culture=neutral, PublicKeyToken=b03f5f7f11d50a3a" />

  </configSections>
  <myConfigSection>
    <add key ="ALPHA" value="1|1"/>
    <add key ="BETA" value="1|1"/>
    <add key ="GAMA" value="1|1"/>
  </myConfigSection>

  <!-- NOTE: Loading section from a external file-->
  <minestroneSection configSource="minestroneSection.config" />

  <startup>
    <supportedRuntime version="v4.0" sku=".NETFramework,Version=v4.5" />
  </startup>
</configuration>

I hope this is good enough for setting up quickly custom configuration files in your .NET projects.
The sample is at https://github.com/hmadrigal/playground-dotnet/tree/master/MsDotNet.CustomConfigFile and please remember to install the Custom Section Designer if you want to take the option for more detailed configuration file.

Regards,
Herber

Multiple configuration files per environment


Hello,

Today I had the chance to perform a quick research about a classic problem. If have different settings for development, testing, staging and production. So, we usually merge or lost settings of the configuration files. Visual Studio 2008 have already resolved the problem (at least in web applications) by allowing the user to create different web.config files and applying XSLT to generate the final configuration file. Today I’ll propose the same solution, but for desktop Apps, and hopefully you could apply this solution to any XML file.

Just in case you’re one of those who want to download a sample, you coudl get it at https://github.com/hmadrigal/playground-dotnet/tree/master/MsDotNet.MultipleConfigurationFile

The Problem:

We have a configuration file ( .config or any xml document), and we want to have different settings per environment (development, testing, staging and production). Moreover we want to automate this process, so we don’t have to write the settings manually.

Remarks

  • It’s good to know basics of MSBuild and how to modify project.
  • It’s good to know about XML, XPath and XSLT

The solution

Create one configuration per environment 

Let’s start by creating configuration settings for each environment where you need custom settings. You could do it by click on “Configuration Manager…“. For example I’ve created the environments that we’re gonna use on this example.

Image

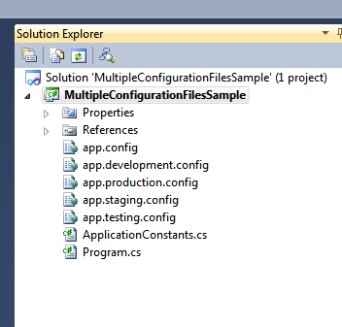
Now, add a configuration file (in our case app.config) and also add one config file per environment. Please note that the configuration file app.config contains most of the final content, and the other configuration files will hold only XSLT expressions to modify the original. As a convention usually the file names are: app.$(environment).config. The following image illustrates the configuration files:

Image

More in detail app.config, contains three simple settings:

<?xml version="1.0" encoding="utf-8"?>
<configuration>
  <appSettings>
    <add key="EnvironmentName" value="Debug" />
    <add key="ApplicationDatabase" value="Data Source=DevelopmentServer\SQLEXPRESS;Initial Catalog=DevelopmentDatabase;Integrated Security=True;" />
    <add key="ServerSharedPath" value="\\127.0.0.1" />
  </appSettings>
</configuration>

Set up your project to use a XslTransform task once the compilation is done

Now you will have to edit the project file using a text editor. VS project files are XML, these normally are read by VS and see the project structure. However there are tasks that only can be customized by editing manually the XML file. You can modify the xml of a project within Visual Studio by using right (secondary) click on the project from the Solution Explorer. Then, click on “Unload project”, and once again right click and now select “Edit project …”. Now, you should be able to see the XML associated to the selected project.

You’ll be adding two targets (or if modifying if any of them is already in place). The following code:

<Target Name="ApplySpecificConfiguration" Condition="Exists('App.$(Configuration).config')">
    <XslTransformation XmlInputPaths="App.config" XslInputPath="App.$(Configuration).config" OutputPaths="$(OutputPath)$(RootNamespace).$(OutputType).config" />
    <Copy SourceFiles="$(OutputPath)$(RootNamespace).$(OutputType).config" DestinationFiles="$(OutputPath)$(RootNamespace).vshost.$(OutputType).config" />
  </Target>
  <Target Name="AfterBuild">
    <CallTarget Targets="ApplySpecificConfiguration" />
  </Target>

The previous XML portion Adds a custom task called and it uses MSBuild variables to determine the name of the configuration file, our example is using a Console App, thus we need to create a copy of the config file but with vshost.config extension, so we added a copy task.  The second thing we’ve added is a call to the task we’ve just created, this call is added into the AfterBuild Target. The AfterBuild is invoked by MSBuild automatically when the build process has finished.

Transform your app.config with XSLT

On this section, we’re gonna write the content for each configuration. This will let us custom XML porting into the final configuration file. As example, here is the XML for the production transformation:

<?xml version="1.0" encoding="utf-8"?>
<xsl:stylesheet version="1.0" xmlns:xsl="http://www.w3.org/1999/XSL/Transform" xmlns:msxsl="urn:schemas-microsoft-com:xslt" exclude-result-prefixes="msxsl">
  <xsl:output method="xml" indent="yes"/>

  <!-- Nodes to be replaces -->
  <xsl:template match="/configuration/appSettings/add[@key='EnvironmentName']">
    <add key="EnvironmentName" value="Production" />
  </xsl:template>
  <xsl:template match="/configuration/appSettings/add[@key='ApplicationDatabase']">
    <add key="ApplicationDatabase" value="Data Source=PRODUCTION\SQLEXPRESS;Initial Catalog=ProductionDatabase;Integrated Security=True;" />
  </xsl:template>
  <xsl:template match="/configuration/appSettings/add[@key='ServerSharedPath']">
    <add key="ServerSharedPath" value="\\PRODUCTION" />
  </xsl:template>

  <!-- Copy all the remaining nodes -->
  <xsl:template match="node()|@*">
    <xsl:copy>
      <xsl:apply-templates select="node()|@*"/>
    </xsl:copy>
  </xsl:template>
</xsl:stylesheet>

I know XSLT might sound intimidating at first, but it’s kinda easy.BTW XSLT uses XPath, so if you want to know the basics of them, please check out w3c school for a quick reference. XPath at http://www.w3schools.com/xpath/xpath_examples.asp and XSLT at http://www.w3schools.com/xsl/xsl_transformation.asp

To put it in a nutshell, our XSLT is detecting specifically three attributes (by its name and location into the XML) and replacing them with a custom value. All the remaining nodes are kept into the final XML.

Let run our sample

Just to make it work I’ve coded two classes, one that defines the constant name of the settings and a main class which print values from the configuration file.

using System;
using System.Configuration;

namespace MultipleConfigurationFilesSample
{
    public static class ApplicationConstants
    {
        public class AppSettings
        {
            public const string ServerSharedPath = @"ServerSharedPath";
            public const string EnvironmentName = @"EnvironmentName";
            public const string ApplicationDatabase = @"ApplicationDatabase";
        }
    }
    class Program
    {
        static void Main(string[] args)
        {
            var environment = ConfigurationManager.AppSettings[ApplicationConstants.AppSettings.EnvironmentName];
            var serverSharedPath = ConfigurationManager.AppSettings[ApplicationConstants.AppSettings.ServerSharedPath];
            Console.WriteLine(@"Environment: {0} ServerSharedPath:{1}", environment, serverSharedPath);
            Console.ReadKey();
        }
    }
}

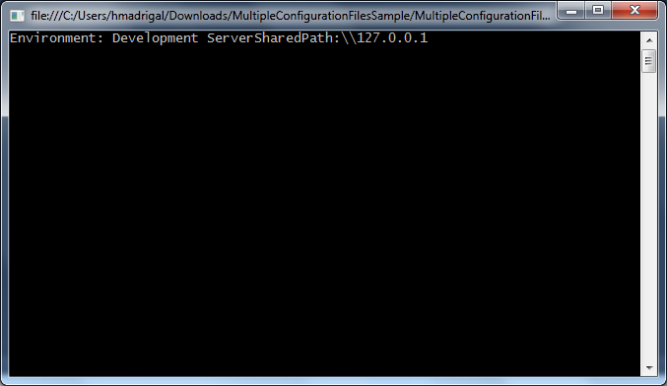
Now I have run the application twice, but using different configurations. The first was using development and I got the following output:

Image

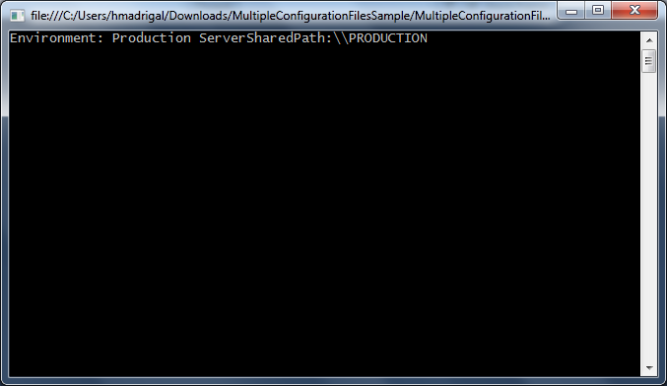
The second was using Production configuration, and it produces the following output:

Image

As you can see, the selected environment is determining the settings into the resultant configuration file.

As usual the source code can be fond at https://github.com/hmadrigal/playground-dotnet/tree/master/MsDotNet.MultipleConfigurationFile

References:
References: http://litemedia.info/transforming-an-app-config-file

Best regards,
Herber

How to create a plug in using C# .NET (4.0) and MEF


Hello,

Long time ago I wrote my approach of how to write a plugin (add in) using Microsoft Unity (http://unity.codeplex.com/). In my old approach (https://hmadrigal.wordpress.com/2010/03/28/writing-a-plug-in/) was using the unity.config file to load dynamically the plugins. Certainly the major issue with this approach it’s that you will have to update your unity.config file every time you add a new plugin.

As usual there is a code sample of all this at:
https://github.com/hmadrigal/playground-dotnet/tree/master/MsDotNet.PluginWithMEF The code runs in MonoDevelop as well as in Visual Studio.

On this post I’ll explain how to easily use Microsoft Extensibility Framework (MEF) http://msdn.microsoft.com/en-us/library/dd460648.aspx to load plugins from a directory. Additionally MEF is a framework to create plugins and extensible applications, so it supports more operations other than loading types from external assemblies.

The problem

I want to load different language implementations provided in different assemblies. So, each DLL might (or might not) contain an implementation of a supported language. Moreover, the assemblies can be implemented by third party members, so I cannot binding them into my project at compile time.

The Solution

Defining what on my application needs to be extensible
Define a common contract in order to identify a class which provided a supported language. Moreover all the “extensible” portion of your application should be encapsulated into a simple assembly that could be redistributed to other developers who wants to implement the plugin.
BTW, when implementing plug ins, it’s normal to define a contract (or interface) which defines the required functionality.I’ll be using the word “part” when I’m talking about contract or interfaces.
The project MefAddIns.Extensibility defines an interface which can be used to provide a supported language.

namespace MefAddIns.Extensibility
{
    using System;
    using System.Collections.Generic;
    using System.Linq;
    using System.Text;
    /// <summary>
    /// Defines the functionality that third parties have to implement for my language plug in
    /// </summary>
    public interface ISupportedLanguage
    {
        string Author { get; }
        string Version { get; }
        string Description { get; }
        string Name { get; }
    }
}

Implementing the plug in
Now it’s the time to provide implementation of supported languages. Each project of MefAddIns.Language.English, MefAddIns.Language.Japanese and MefAddIns.Language.Spanish provides at least one implementation for the interface ISupportedLanguage. These projects could be developed internally or by third party people. An example of this implementation is:

namespace MefAddIns.Language.English
{
    using MefAddIns.Extensibility;
    using System.ComponentModel.Composition;

    /// <summary>
    /// Provides an implementation of a supported language by implementing ISupportedLanguage.
    /// Moreover it uses Export attribute to make it available thru MEF framework.
    /// </summary>
    [Export(typeof(ISupportedLanguage))]
    public class EnglishLanguage : ISupportedLanguage
    {
        public string Author
        {
            get { return @"Herberth Madrigal"; }
        }
        public string Version
        {
            get { return @"EN-US.1.0.0"; }
        }
        public string Description
        {
            get { return "This is the English language pack."; }
        }
        public string Name
        {
            get { return @"English"; }
        }
    }
}

Please note that the attribute Export indicates to MEF framework that the class EnglishLanguage can be used when a ISupportedLanguage is requested. In other words, if any other application is looking for a part ISupportedLanguage then MEF framework will suggest EnglishLanguage. In further steps we are going to create a MEF catalog which is the mechanism to associate exported parts with the members which need to import parts.

Defining the parts that my application needs to import
The simplest way of doing this with MEF is by using the import attribute. On this case I’ll be using ImportMany because of I’ll be expecting many (0 or more) implementations of the ISupportedLanguage interface. For example:

namespace MefAddIns.Terminal
{
    using MefAddIns.Extensibility;
    using System.Collections.Generic;
    using System.ComponentModel.Composition;

    public class Bootstrapper
    {
        /// <summary>
        /// Holds a list of all the valid languages for this application
        /// </summary>
        [ImportMany]
        public IEnumerable<ISupportedLanguage> Languages { get; set; }

    }
}

Composing your objects by using (MEF) catalogs
Before getting into details I’ll like to point out some concepts:

Part: It’s the portion of our code that can be exported or imported.
Export: It’s the fact of indicating that a portion of our code is available and it fits a set of traits. E.g. EnglishLanguage implements the ISupportedLanguage Interface, thus I can add the attribute Export(typeof(ISupportedLanguage)).
Import: It’s the fact of indicating that a portion of our code requires a part that fits a set of traits. E.g. I need to import a give language, then I define a property of ISupportedLanguage type and set the attribute Import(typeof(ISupportedLanguage)).
Catalog: It a source of Exports and Import definitions. It could be the current execution context or a set of binaries files (such as dlls, exes).
Container: It’s an module which deals with class instantiation. This item uses the catalog when needed in order to create the instances during the composition process.
Composition: It’s the fact of taking an object and making sure that all its needs regarding imports are fulfilled. Certainly this will depends on the catalogs and the export and imports that are being used on the catalog.

Now, that we now more about come MEF concepts. Lets talk more about MEF in our example. MEF detects that some code is Exporting parts, and other code is Importing. The process of loading the parts is made by creating a catalog. There are many ways of creating catalogs, on my example is using a DictionaryCatalog. The DictionaryCatalog uses a directory to look for files, and it creates a catalog with all the exported parts from the assemblies (or files) of the given directory. Finally our application creates an instance of the Bootstrapper class, this instance indicates that it requires all the possible instances of ISupportedLanguages that are into the DictionaryCatalog. Here is a sample of this:

namespace MefAddIns.Terminal
{
    using System.ComponentModel.Composition.Hosting;
    using System.ComponentModel.Composition;
    using System;

    class Program
    {
        static void Main(string[] args)
        {
            var bootStrapper = new Bootstrapper();

            //An aggregate catalog that combines multiple catalogs
            var catalog = new AggregateCatalog();
            //Adds all the parts found in same directory where the application is running!
            var currentPath = System.IO.Path.GetDirectoryName(System.Reflection.Assembly.GetAssembly(typeof(Program)).Location);
            catalog.Catalogs.Add(new DirectoryCatalog(currentPath));

            //Create the CompositionContainer with the parts in the catalog
            var _container = new CompositionContainer(catalog);

            //Fill the imports of this object
            try
            {
                _container.ComposeParts(bootStrapper);
            }
            catch (CompositionException compositionException)
            {
                Console.WriteLine(compositionException.ToString());
            }

            //Prints all the languages that were found into the application directory
            var i = 0;
            foreach (var language in bootStrapper.Languages)
            {
                Console.WriteLine("[{0}] {1} by {2}.\n\t{3}\n", language.Version, language.Name, language.Author, language.Description);
                i++;
            }
            Console.WriteLine("It has been found {0} supported languages",i);
            Console.ReadKey();
        }

    }
}

Now that we have all that our application requires, we’re able to run the app and see the following output:

Example of the output where it lists all the supported languages

Hey It’s not printing anything!!!
Ok. There is an additional thing to talk, which it’s not strictly related to MEF. As your might noticed our sample application does not have references to any of the MefAddIns.Language.* Dlls but it’s running code from them. Here is the deal, since our application uses MEF we don’t need to reference directly these DLLS, we just need to copy them into the directory where the DirectoryCatalog is going to look for them. The code sample looks into the directory where the application is running, so we have configured our main csproj to copy the DLLS to the output directory of our main application.
To keep it simple, you can do it in two steps 😉
1) Add the external DLLs into your project. First, Right click on your main project, and click on “Add existing item…”. Look for the DLL, and select “Add as a Link”. The configure the properties of the added file to copy always or copy when newer.
2) Update the csproj file. Right click on your project, and the select “Unload project”. Then once again right click on your project and select “Edit xxxxx.csproj”. This will open the project as an XML file. Look for the added DLL, and replace part of portions of the path for MSBuild variables such as $(Configuration). Note that there are more options to do this, such as using the Copy task from MSBuild (see http://stackoverflow.com/questions/266888/msbuild-copy-output-from-another-project-into-the-output-of-the-current-project ). In our sample this was enough because we are looking for DLLs into the current directory, but depending on your file structure this won’t be recommended.

<ItemGroup>
    <Content Include="
..\MefAddIns.Language.English\bin\$(Configuration)\MefAddIns.Language.English.dll;
..\MefAddIns.Language.Japanese\bin\$(Configuration)\MefAddIns.Language.Japanese.dll;
..\MefAddIns.Language.Spanish\bin\$(Configuration)\MefAddIns.Language.Spanish.dll;">
      <CopyToOutputDirectory>PreserveNewest</CopyToOutputDirectory>
      <Visible>false</Visible>
    </Content>
  </ItemGroup>

At last comment, this is the most basic sample of using MEF to create a plugin-based structure. There are more things to consider , e.g. the path where your DLLs are going to be placed or how your main application is going to exchange information with the plugins. MEF has also more options to create extensible applications. Also, it’s important to consider when it’s good to create plugin based architectures rather that tightly coupled apps.

EDIT In my last update I modified the project (csproj) to make it run on MonoDevelop ;-). The major change is that some tasks on MSBuild aren’t available in XBuild. So, the last step which modified the csproject, now looks like:

<ItemGroup Condition=" '$(Configuration)|$(Platform)' == 'Debug|AnyCPU' ">
    <Content Include="..\MefAddIns.Language.English\bin\Debug\MefAddIns.Language.English.dll">
      <CopyToOutputDirectory>PreserveNewest</CopyToOutputDirectory>
      <Visible>False</Visible>
    </Content>
    <Content Include="..\MefAddIns.Language.Japanese\bin\Debug\MefAddIns.Language.Japanese.dll">
      <CopyToOutputDirectory>PreserveNewest</CopyToOutputDirectory>
      <Visible>False</Visible>
    </Content>
    <Content Include="..\MefAddIns.Language.Spanish\bin\Debug\MefAddIns.Language.Spanish.dll">
      <CopyToOutputDirectory>PreserveNewest</CopyToOutputDirectory>
      <Visible>False</Visible>
    </Content>
  </ItemGroup>
  <ItemGroup Condition=" '$(Configuration)|$(Platform)' == 'Release|AnyCPU' ">
    <Content Include="..\MefAddIns.Language.English\bin\Release\MefAddIns.Language.English.dll">
      <CopyToOutputDirectory>PreserveNewest</CopyToOutputDirectory>
      <Visible>False</Visible>
    </Content>
    <Content Include="..\MefAddIns.Language.Japanese\bin\Release\MefAddIns.Language.Japanese.dll">
      <CopyToOutputDirectory>PreserveNewest</CopyToOutputDirectory>
      <Visible>False</Visible>
    </Content>
    <Content Include="..\MefAddIns.Language.Spanish\bin\Release\MefAddIns.Language.Spanish.dll">
      <CopyToOutputDirectory>PreserveNewest</CopyToOutputDirectory>
      <Visible>False</Visible>
    </Content>
  </ItemGroup>

The code sample for this application is at:
https://github.com/hmadrigal/playground-dotnet/tree/master/MsDotNet.PluginWithMEF

Best regards,
Herber

Visual Studio re install individual packages


Hi,

I remember that sometime ago my Visual Studio installation didn’t install the package correctly. And if you’ve installed visual studio you might know that the standard installation might take 1 hour at least. If you decide to repair the visual studio then the process can take 2 hours. However by reinstalling the visual studio you still might have errors.

I resolved my problems by reinstalling only the broken package. So, I’ll explain how you can do this. I’ll take the images from my friend Anthony (arbot) which has the same issue, and he could solve it by installing only what he needed (see details at this post). So my example is based on Arbot’s problem with the “Microsoft SQL Server 2008 Management Objects

Step 1: Prepare your bat-belt
Easy dude, you will need the Visual Studio Installation files. You are more likely to need admin rights to perform installation tasks.

Step 2: Identify your broken component
In the Arbot, the broken package was “Microsoft SQL Server 2008 Management Objects”. Unfortunately these kind of errors does not have a friendly message. Usually they might look like:

So don’t be afraid if you see:
Could not load file or assembly
‘Microsoft.SqlServer.Management.SqlParser, Version=10.0.0.0, Culture=neutral, PublicKeyToken=89845dcd8080cc91’ or one of its dependencies. The system cannot find the file specified

The thing here is that you should be able to recognize which part of your Visual Studio is failing. If you aren’t sure about the component, then check the list of packages /components that Visual Studio installs at
http://msdn.microsoft.com/en-us/library/ee225240.aspx

Step 3: Remove what it’s not working
Once you know what component is missed, go to the control panel and uninstall the specific component. In the case or Arbot he uninstalled all the products from the “Microsoft SQL Server 2008 Management Objects”, which are under the folder WCU\SMO see http://msdn.microsoft.com/en-us/library/ee225240.aspx to know which components are installed under the same folder.

Step 4: Make sure you’re ready to reinstall
Ok, It seems obvious, but before installing the Visual studio components you will have to make sure that your current installation has all the components you might need. So, take your time and check http://msdn.microsoft.com/en-us/library/ee225240.aspx and the prerequisites 😉

Step 5: Install in order each package
open a command prompt in admin mode. (I’d recommend Visual Studio Command Prompt), and make sure MSIExec is in your path (http://technet.microsoft.com/library/cc759262(WS.10).aspx). So, we can run the installer from the command prompt.
Now In the command prompt, go to the installer folders of your broken package. In the case of Arbot, look for “WCU\SMO” folder. Review which platform you’re using because X86 platforms uses different commands than the X64 platforms. Additionally there are two kind of X64 platforms.
One you have identifies the packages that you have to install run the commands, in the case of Arbot he ran these commands:


C:\Windows\system32>MSIExec SQLSysClrTypes_x86_enu.msi /log "%TEMP%\dd_SQLSysClr
Types_x86_msi.txt"
C:\Windows\system32>MSIExec SharedManagementObjects_x86_enu.msi /log:"%TEMP%\dd_SharedManagementObjects_x86_MSI.txt"

Depending of the settings you’ve specified for MSIExec you might have to attend the installation and restart your computer.

Step 6: Try you reinstalled component on visual studio
If the installation worked properly it shouldn’t report any issue, and you always have the option to check the log file generated by the MSIExec.

Now you should be able to run Visual Studio and try once again to use the feature on Visual studio, and hopefully it should be working properly. My friend Anthony made a post about his problem 😉 if you need to see more pics 😀

http://abakerp.blogspot.com/2011/02/cannot-load-file-or-assembly.html

Best regards,
Herber

Microsoft Unity2 Block and Generics into Configuration File


Hi,

I saw a question in stackoverflow about using Microsoft Unity Block to resolve generic types. At first I was surprised because I didn’t know Unity could specify Generics into the configuration file. So, after some research I realize some facts, that I’d like to share with you.

Microsoft Enterprise Libraries 5 is using Unity. The developers were planning to include a editor for the Unity Block, which was available during the beta, but it was removed from the final version. This editor is not the final, but it’s good enough to help you to write your mappings.
Sample of the Unity config file
Now we’re ready to start solving our problem of how to use Unity to resolve interfaces (or contracts) which are using generics. All this by using a configuration file. Lets take a look to the configuration file:

<pre><code><?xml version="1.0" encoding="utf-8" ?>
<configuration>
  <configSections>
    <section name="unity" type="Microsoft.Practices.Unity.Configuration.UnityConfigurationSection, Microsoft.Practices.Unity.Configuration"/>
  </configSections>
  <unity xmlns="http://schemas.microsoft.com/practices/2010/unity">
    <alias alias="StringListContract" type="System.Collections.Generic.IList`1[[System.String, mscorlib, Version=2.0.0.0, Culture=neutral, PublicKeyToken=b77a5c561934e089]], mscorlib, Version=2.0.0.0, Culture=neutral, PublicKeyToken=b77a5c561934e089" />
    <alias alias="ConcreteStringList" type="System.Collections.Generic.List`1[[System.String, mscorlib, Version=2.0.0.0, Culture=neutral, PublicKeyToken=b77a5c561934e089]], mscorlib, Version=2.0.0.0, Culture=neutral, PublicKeyToken=b77a5c561934e089" />
    <container>
      <register type="StringListContract" mapTo="ConcreteStringList">
        <lifetime type="ContainerControlledLifetimeManager" />
        <constructor />
      </register>
    </container>
  </unity>
</configuration></code></pre>

As you can see, configuration is simple. A quick note is that when it’s registered the type resolution IList => List. This resolution specifies a default default constructor. This is because of Unity block cannot determine the best constructor for the List. Additionally this sample is using signed dlls, so the references of IList, List and String are signed.

The last part of this sample, is consuming this configuration file.

<pre><code>using System;
using System.Collections.Generic;
using System.Linq;
using System.Text;
using Microsoft.Practices.Unity;
using Microsoft.Practices.Unity.Configuration;
namespace UnityTerminal
{


    class Program
    {
        static void Main(string[] args)
        {
            var container = new UnityContainer();
            container.LoadConfiguration();
            {
                var concreteStringList = container.Resolve<System.Collections.Generic.IList<System.String>>();
                concreteStringList.Add("Hello World");
            }
            {
                var concreteStringList = container.Resolve<System.Collections.Generic.IList<System.String>>();
                Console.WriteLine("{0}", concreteStringList[0]);
            }
            Console.ReadKey();
        }
    }
}</code></pre>

So, by doing this the first call to resolve will retrieve resolve the type based on the configuration file, the second call is used to verify the implemented behavior by printing the previous stored value.

Best regards,
Herber